


Let me tell you about the exact moment I understood electricity.
Not in school — I sat through those lessons the way most people do, understanding just enough to pass and forgetting most of it by the following Tuesday. No, I mean the moment it actually clicked.
I was parked on a remote hillside as the sun disappeared behind the ridge. A tiny red light on my charge controller blinked at me like a disappointed parent. My battery was down to 11%. My fridge had two hours left. My laptop had forty minutes. Earlier that afternoon, I had been convinced my solar setup was working just fine.
It wasn’t.
I had made several beginner mistakes at once, and that evening I was paying for every one of them.
That night, cooking dinner by headlamp and rationing my phone battery, I made myself a promise: I was going to understand this system properly. Not just plug things together and hope for the best, but understand how the electricity moved, what every component did, and why things sometimes went wrong.
This guide is the one I wish I’d had before building my first van solar system. We’ll break down the entire setup—from solar panels and batteries to charge controllers and inverters—in plain English, show you how to calculate your power needs, avoid expensive mistakes, and build a reliable off-grid power system without blowing your budget.
Let’s build a power grid.
A small one.
On wheels.
How a Camper Van Solar System Works
Before we touch a single component, let’s understand what we’re actually building. Because here’s the thing — a van solar system is not magic, and it isn’t nearly as complicated as it first appears. It is, at its core, a simple chain of energy conversion and storage. Once you see that chain clearly, everything else falls into place.
Here’s the whole system in plain English:
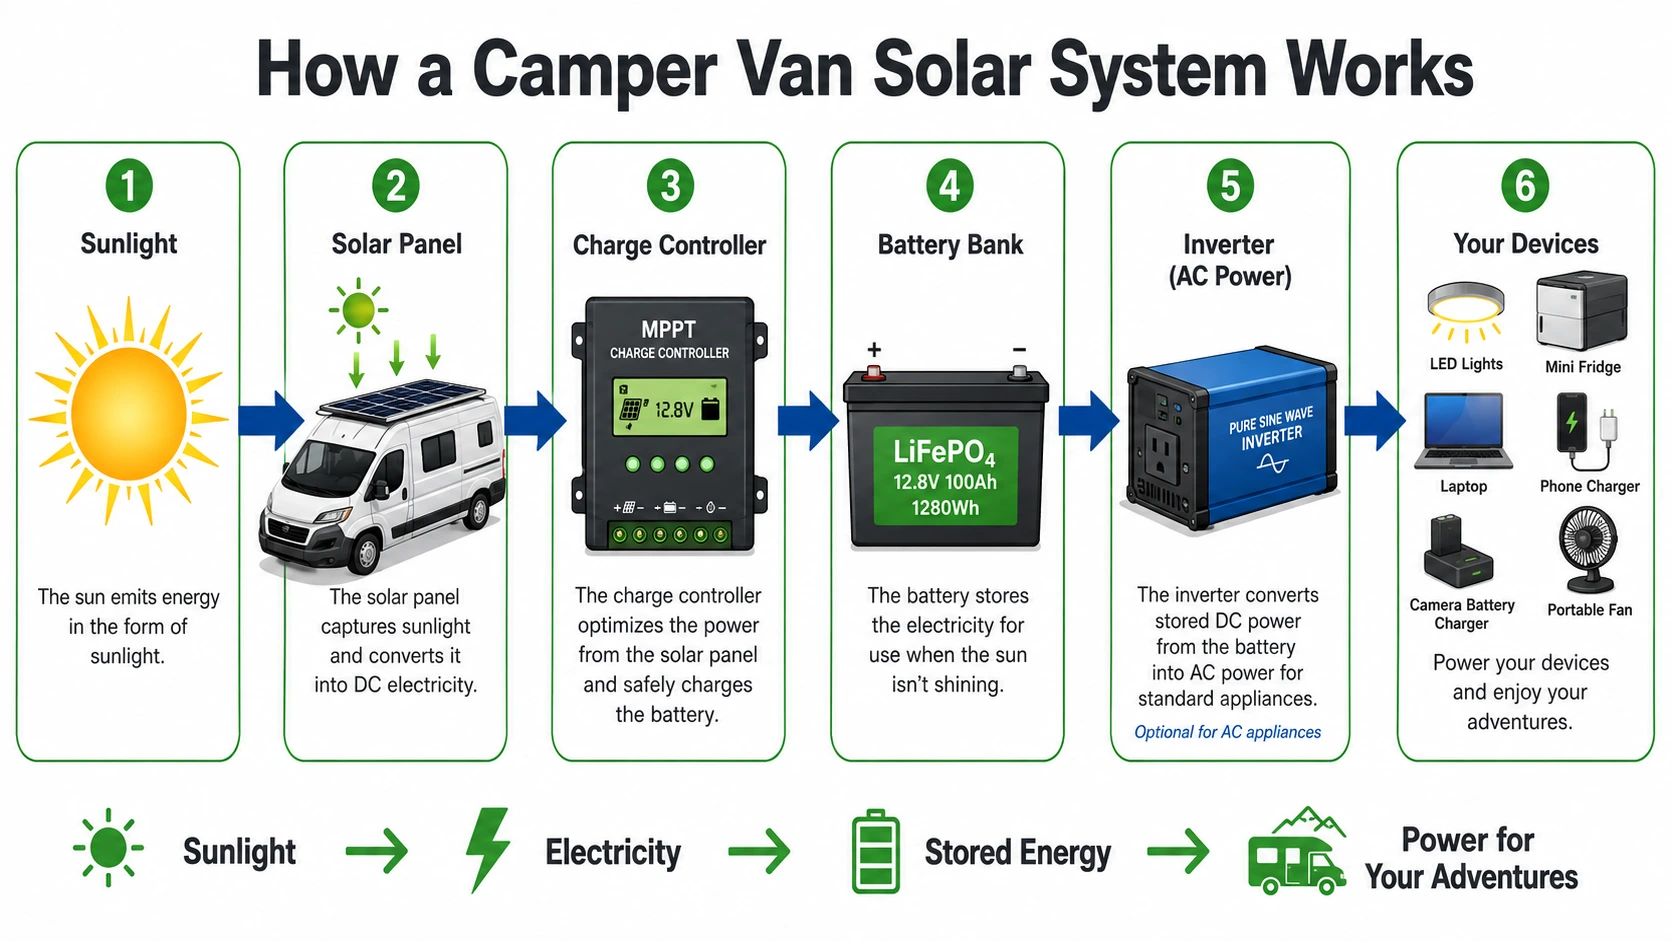
The Sun → Solar Panel → Charge Controller → Battery Bank → Your Stuff
That’s it. That’s the whole system.
Sunlight hits your solar panel, which converts it into direct current (DC) electricity through the photovoltaic effect—the phenomenon Albert Einstein explained in 1905, work that later earned him the 1921 Nobel Prize in Physics. That electricity then flows into a charge controller, which acts as the system’s traffic manager. It ensures your battery receives power safely and efficiently by regulating voltage and current, preventing overcharging and other conditions that could shorten the battery’s lifespan.
The battery stores that energy until you need it. Whenever you switch on a light, charge your laptop, or power your fridge, electricity flows from the battery to your devices.
If you’re using standard household appliances—which run on alternating current (AC) rather than 12V direct current (DC)—you’ll also need an inverter. It converts the battery’s DC power into the AC power that most appliances require. We’ll cover that in more detail later.
The beauty of this setup is that every component has one clear job. If something stops working, you can usually trace the problem back through this chain to find exactly where things went wrong.
If you’d like to understand the science behind how photovoltaic (PV) cells convert sunlight into electricity, the U.S. Department of Energy’s guide to how solar works provides an excellent beginner-friendly explanation. U.S. Department of Energy’s guide to how solar works.
💡Bottom Line
A van solar system isn’t a collection of confusing gadgets. It’s simply a chain of components, each with one specific job. Once you understand that chain, the rest becomes much easier.
Step 1: Calculate Your Power Needs
This is the least exciting part of building a van solar system and, arguably, the most important. Skip it, and every decision you make afterwards will be based on guesswork. It’s like building a house before measuring the land.
You need to calculate your daily energy consumption in watt-hours (Wh). A watt-hour is simply:
Watts × Hours of Use = Watt-hours (Wh)
It answers the question: how much energy do I actually use in a day?
Let’s do a real example. Say your setup includes:
| Device | Power Draw | Daily Hours | Daily Wh |
|---|---|---|---|
| 12V compressor fridge | 45W average | 24 hrs (runs intermittently) | ~500Wh |
| LED lighting (3 strips) | 15W total | 4 hrs | 60Wh |
| Laptop | 65W | 3 hrs | 195Wh |
| Phone charging x2 | 20W | 2 hrs | 40Wh |
| Fan (12V) | 30W | 5 hrs | 150Wh |
| Total | — | — | ~945Wh/day |
That number — roughly 1 kilowatt-hour per day — is your baseline. Everything downstream (how many panels you need, how big your battery bank should be, what size charge controller to buy) is calculated from it.
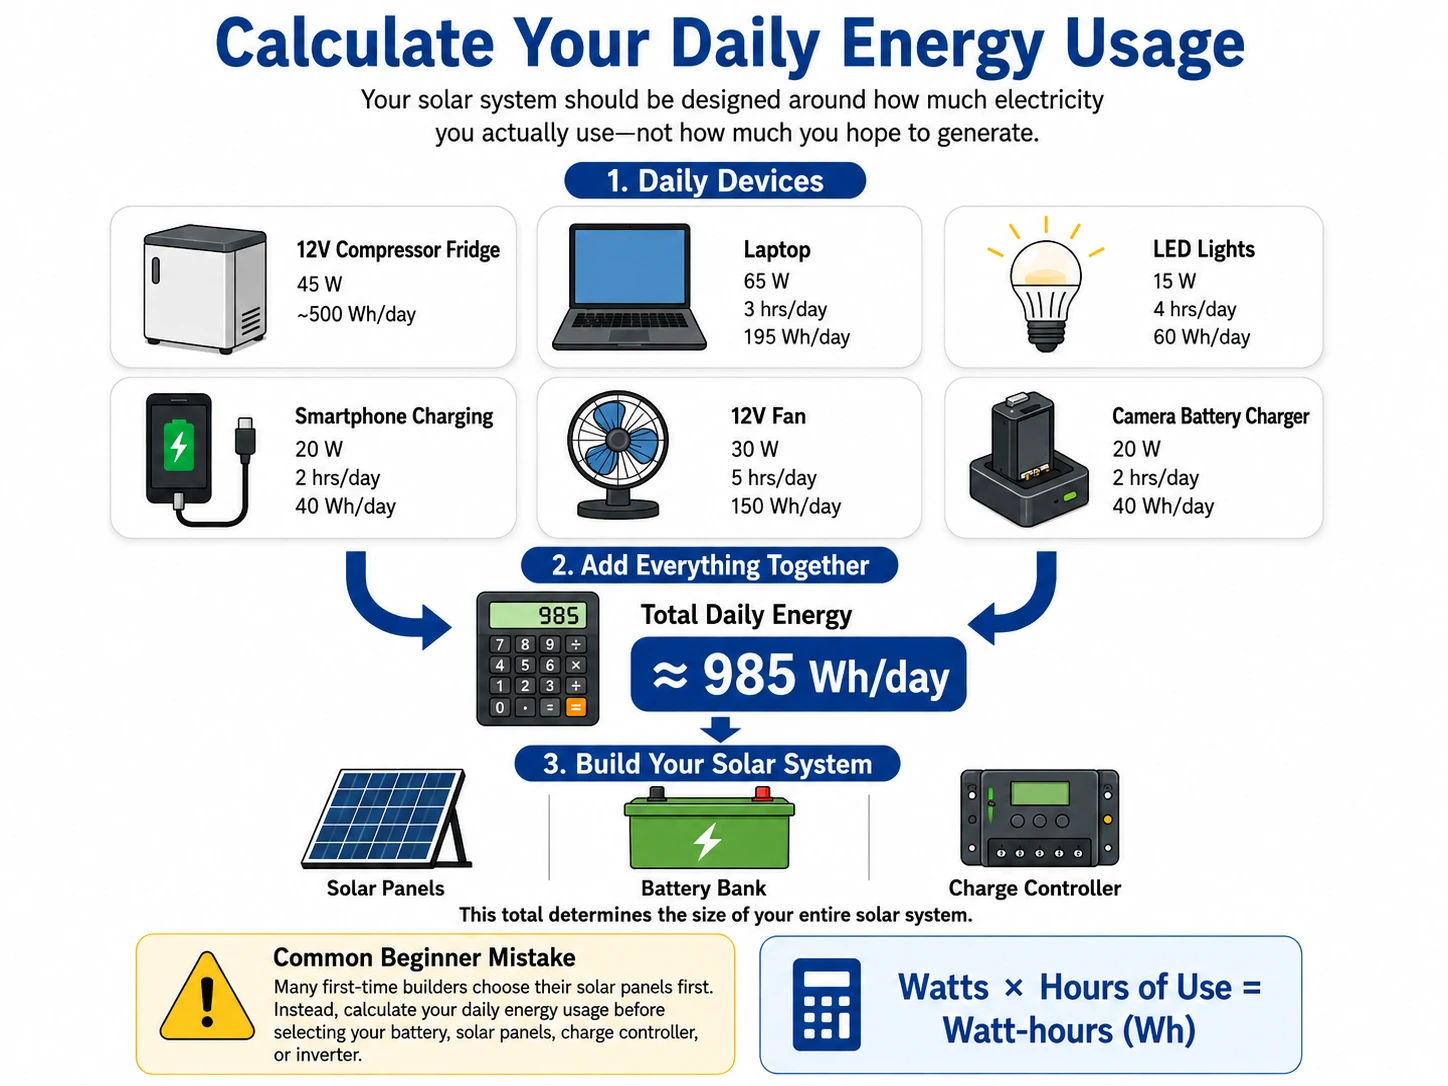
A common beginner mistake: Many first-time builders calculate how much electricity their solar panels can produce and assume they can use all of it. In reality, heat, wiring losses, charge controller efficiency, and battery conversion typically reduce usable energy by 20–30%. Plan around what your system actually delivers—not what the specification sheet says under ideal laboratory conditions.
💡Bottom Line
Don’t choose your solar panels first.
Start by calculating your daily energy use. Once you know how much electricity you actually need, choosing the right battery, solar panels, and charge controller becomes straightforward.
Step 2: Choose Your Solar Panels
Solar panels are the part everyone gets excited about. They’re visible, easy to compare, and often treated as the heart of a van solar system. In reality, they’re just one piece of the puzzle. The best panel isn’t necessarily the biggest one; it’s the one that matches your daily energy needs, available roof space, and travel style.
How they work:
A solar panel is made of photovoltaic cells, typically silicon-based, which release electrons when photons from sunlight strike them. This creates a flow of direct current electricity. The more cells, the more surface area, and the more efficient the cells, the more electricity per hour of sunlight you generate.
The types you’ll encounter:
- Monocrystalline panels are cut from a single silicon crystal. They’re the most efficient type currently available for consumer use – typically 20–22% efficiency, meaning they convert about a fifth of the sunlight that hits them into electricity. They’re space-efficient (you get more watts per square meter), they perform relatively well in low-light and high-temperature conditions, and they last 25–30 years. They cost a bit more, but for a van or mobile setup where roof space is genuinely limited, the efficiency premium is usually worth it.
- Polycrystalline panels are made from multiple silicon fragments melted together. They’re less efficient (around 15–18%), slightly cheaper, and visually distinguishable by their blue, fragmented crystalline appearance versus the uniform black of monocrystalline panels. For a van roof, I’d generally recommend monocrystalline unless the budget is very tight.
- Thin-film panels are flexible, lightweight, and can conform to curved surfaces, which makes them appealing for van roofs with irregular shapes. However, they’re the least efficient (around 10–13%) and degrade faster. They’re a reasonable compromise for specific installation challenges but not a first choice.
| Feature | Monocrystalline | Polycrystalline | Thin-Film |
|---|---|---|---|
| Efficiency | ⭐⭐⭐⭐⭐ (20–22%) | ⭐⭐⭐ (15–18%) | ⭐⭐ (10–13%, varies by technology) |
| Weight | Medium | Medium | Light |
| Flexibility | No | No | Some types are flexible |
| Cost | Higher | Lower | Varies |
| Roof Space Needed | Least | More | Most |
| Best Use | Camper vans & RVs | Budget stationary systems | Specialized or lightweight applications |
For most camper van builds, monocrystalline panels are the clear winner. Their higher efficiency means you generate more electricity from limited roof space, making them the preferred choice for modern van conversions. Polycrystalline panels are becoming less common, while thin-film panels are generally reserved for specialized applications where flexibility or low weight matters more than maximum power output.
How many panels do you need?
Here’s the math, and I promise it’s simpler than it looks.
Take your daily consumption figure from Step One. Mine was ~945Wh. Now look up the peak sun hours for the region where you typically travel. This is a real, measured figure that represents the equivalent number of hours per day that your location receives full-strength (1000 W/m²) sunlight. In South Asia, this ranges from roughly 4.5 to 6 peak sun hours depending on location and season, with the southern and arid regions being the most solar-rich. Europe and the UK average around 2.5–4. The American Southwest gets 5.5–7.
The formula:
Solar capacity needed (W) = Daily consumption (Wh) ÷ Peak sun hours ÷ System efficiency factor (0.75–0.80)
For 945Wh at 5 peak sun hours and 0.78 efficiency: 945 ÷ 5 ÷ 0.78 = ~243 watts of panel
Round up to the next convenient configuration. Two 150W panels (300W total) would serve this system well with some headroom, which you always want, because clouds happen.
Solar Array Size Guide: What Can Different Systems Power?
| Solar Array | Typical Daily Energy | Suitable For |
|---|---|---|
| 100W | 300–500 Wh | Weekend camping, lights, phone charging |
| 200W | 600–1,000 Wh | Laptop, lights, small fridge |
| 300W | 900–1,500 Wh | Full-time van life, fridge, electronics |
| 400W+ | 1,200–2,000+ Wh | Heavy daily power use |
💡 Bottom Line
For most camper vans, monocrystalline rigid panels provide the best balance of efficiency, durability, and long-term value. Choose your panel size based on your calculated daily energy needs—not simply the largest panel that fits on your roof.
Step 3: Choose a Charge Controller
The charge controller is the component people understand least and underestimate most. This is a mistake.
Here is what it does:
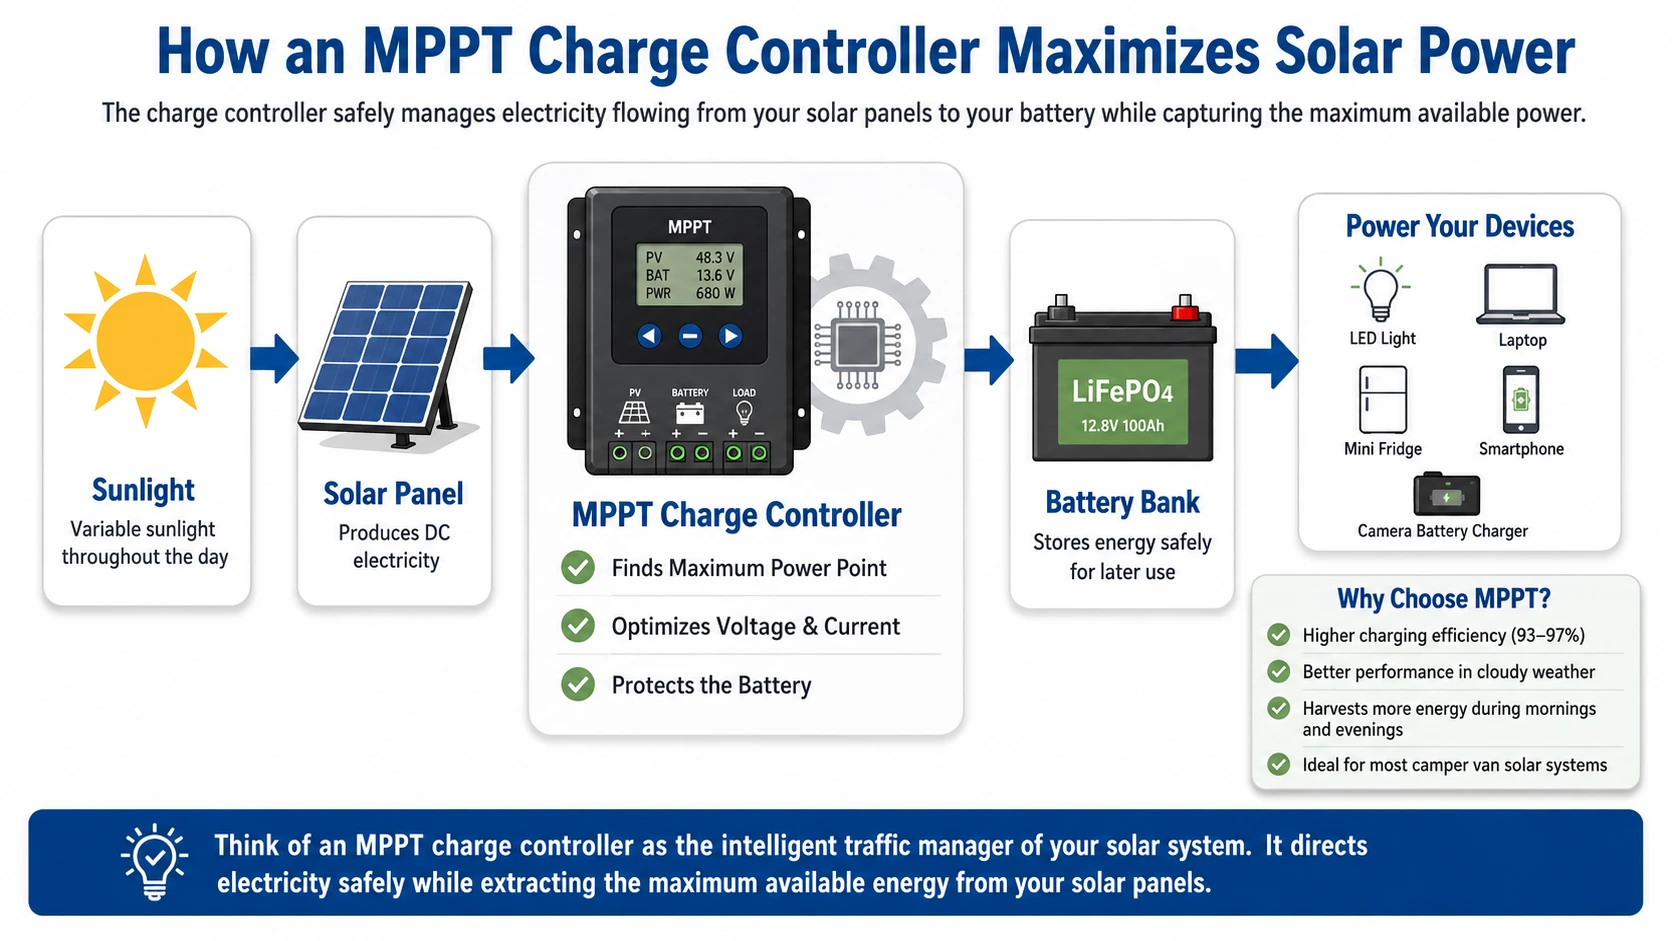
- It sits between your solar panels and your battery, and it continuously manages the flow of electricity between your solar panels and battery to keep charging safe and efficient.
- It prevents overcharging (forcing too much energy into a battery damages it, shortens its life, and in older battery chemistries, can cause off-gassing of hydrogen, a genuine fire and explosion hazard).
- It prevents reverse current flow at night, when panels would otherwise act as a load and slowly drain your battery. And on the better models, it actively optimizes the electrical relationship between panel and battery to extract maximum energy.
The two types you’ll encounter:
PWM (Pulse Width Modulation) controllers are the simpler, cheaper type. They work by rapidly switching the connection between panel and battery on and off to maintain the correct voltage. They’re reliable and fine for small, simple systems, but they’re inherently inefficient — they essentially throttle your panel down to match battery voltage, wasting the potential difference. Real-world efficiency is around 70–80%.
MPPT (Maximum Power Point Tracking) controllers are significantly smarter and worth every extra rupee/dollar for a van system. They use a DC-to-DC converter to continuously find and operate at the panel’s maximum power point — the voltage/current combination that produces the most wattage at any given moment of sunlight intensity. As light conditions change through the day, the MPPT controller adjusts dynamically. Real-world efficiency: 93–97%. On a cloudy day, or during the morning and evening hours when sun angle is low, the difference between a PWM and MPPT controller can be 20–30% more energy harvested. Over a year of full-time van life, that is not a trivial amount.
The rule of thumb: for any system over about 200W, buy an MPPT controller. It will pay for itself in recovered energy within months.
When sizing your charge controller, you need to match it to both your panel configuration’s voltage and your expected maximum current. A 40A MPPT controller is a sensible choice for most single-van systems in the 200–600W range.
💡 Bottom Line
For most camper van solar systems, an MPPT charge controller is worth the extra cost. It captures more energy, especially in cloudy conditions and during the morning and evening, helping your battery recharge faster and more efficiently.
Step 4: Choose Your Battery
If the solar panels are the harvest and the charge controller is the brain, the battery bank is the warehouse. It’s where you store energy to use after sunset, on cloudy days, and during those three-day rainy stretches when you’re parked under a forest canopy and the panels are barely producing anything.
Battery choice is where more money is spent, more mistakes are made, and more opinions are passionately held than anywhere else in the van life world. Let me give you the honest science.
Lead-Acid Batteries (including flooded, sealed, and AGM variants) are the cheapest upfront option. A 100Ah AGM battery might cost you significantly less than its lithium equivalent. But here’s the problem: you can only safely use about 50% of a lead-acid battery’s rated capacity before you start significantly shortening its lifespan. Deep-discharging a lead-acid battery regularly degrades the lead plates through a process called sulfation, and you’ll typically see 300–500 full charge cycles before meaningful capacity loss. In practical terms, a 200Ah lead-acid battery bank gives you only about 100Ah of usable energy per day.
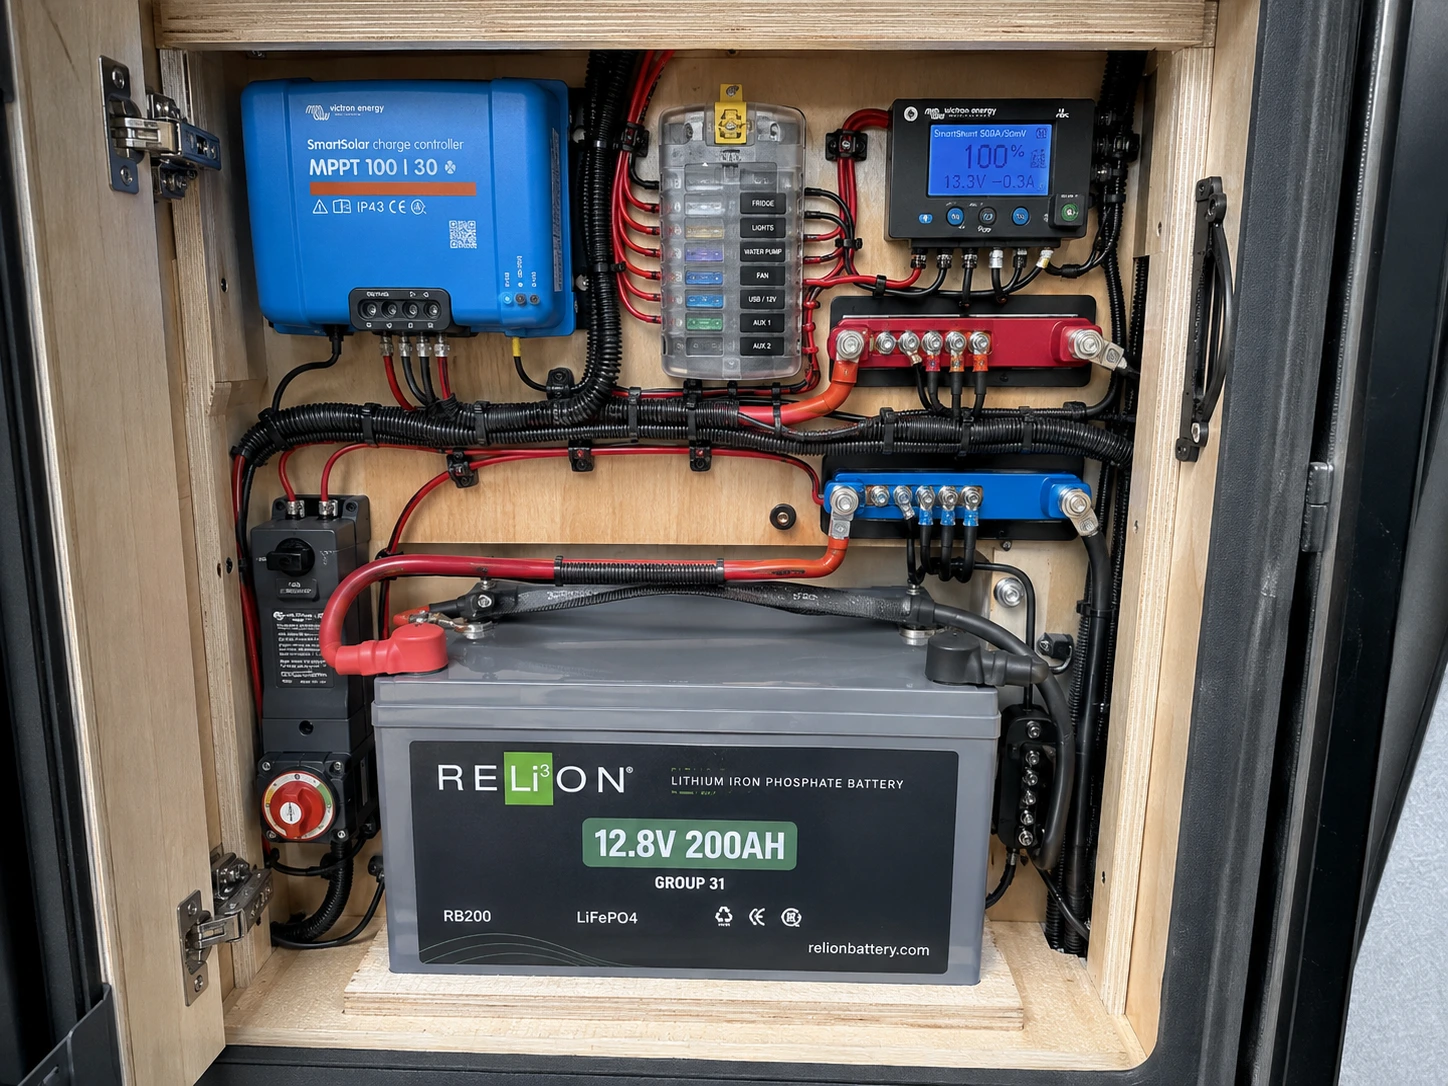
Lithium Iron Phosphate (LiFePO₄) batteries are the chemistry that changed van life, and the science backs the hype. Lithium iron phosphate is genuinely different from lead-acid in several key ways:
LiFePO₄ vs AGM Batteries
| Feature | LiFePO₄ | AGM (Lead-Acid) |
|---|---|---|
| Usable Capacity | 80–100% | ~50% |
| Cycle Life | 2,000–5,000 cycles | 300–500 cycles |
| Weight | About half the weight | Heavier |
| Charging Speed | Faster | Slower |
| Thermal Stability | Excellent | Good |
| Upfront Cost | Higher | Lower |
| Long-Term Value | Excellent | Moderate |
| Best For | Full-time & frequent travel | Budget builds |
One of LiFePO₄’s biggest advantages is its excellent thermal stability. Unlike many other lithium-ion chemistries, it is much less prone to thermal runaway when used correctly, making it a trusted choice for camper vans, boats, and other off-grid applications where safety and reliability are essential.
On comparing these two batteries economically. Yes, LiFePO₄ batteries cost significantly more upfront. But when you do the maths over a 5-year period, accounting for the number of lead-acid batteries you’d replace, the actual usable capacity difference, and the weight savings — LiFePO₄ almost always wins on total cost.
How big should your battery bank be?
A commonly recommended guideline: size your battery bank to store 2–3 days of consumption without any solar input. This gives you a buffer for cloudy days and periods of low sun.
For our 945Wh/day example: 945 × 2.5 = ~2,362Wh. At 12V, that’s about 197Ah. A 200Ah LiFePO₄ battery , now available from several manufacturers at increasingly reasonable prices would be a solid starting point.
💡 Bottom Line
If your budget allows, choose a LiFePO₄ battery. Although it costs more upfront, its longer lifespan, greater usable capacity, lighter weight, and faster charging make it the better long-term investment for most camper van solar systems.
Step 5: Do You Need an Inverter?
Most of the world runs on alternating current (AC) at either 110V or 220V. Your laptop charger, your phone adapter, your camera battery charger, your coffee grinder – they almost certainly use AC. Your van battery speaks direct current (DC) at 12 V. The inverter is the translator.
Modified Sine Wave vs Pure Sine Wave
There are two types, and the difference matters:
Modified sine wave inverters are cheaper and work fine for simple resistive loads like incandescent lights or basic tools. But they produce a choppy approximation of the smooth AC sine wave that your household wall outlet produces. For sensitive electronics – laptops, cameras, medical devices, and some motor-driven appliances – this choppy wave can cause inefficiency, reduced battery life, overheating, and in some cases, damage. I’d avoid them for anything beyond the most basic use case.
Pure sine wave inverters produce AC electricity that is indistinguishable from what comes out of your wall at home. They’re more expensive, but they’re safe for all electronics, more efficient, and quieter in operation. For a van system where you’re running actual electronics, a pure sine wave inverter is the right call.
Choosing the Right Inverter Size
Size your inverter based on peak load, not average load. Many devices – especially anything with a motor: fans, fridges, blenders – draw significantly more power at startup than during steady operation. This is called inrush current or surge load. An inverter rated at 1000W continuous might handle a 2000W surge for a few seconds. Always check this spec against your highest-draw device.
💡 Bottom Line
For most van systems, a 1000–2000W pure sine wave inverter covers the vast majority of needs without over-engineering.
Step 6: Wire Everything Safely
I’m going to be direct about this: incorrect wiring is the part of a solar system that causes fires. Not the panels, not the batteries in normal use — the wires. Specifically: undersized wire, unsecured connections, and missing fuses. Good wiring isn’t just about making your system work; it’s about making sure it continues to work safely for years to come.
The physics is straightforward. When current flows through a wire, it generates heat due to resistance. The thinner the wire, the higher the resistance, the more heat it generates. Put enough current through too-thin a wire and you have an insulated heating element running through your van. The outcome of that is not ambiguous.
Wire sizing:
Wire is sized in AWG (American Wire Gauge) or mm². Lower AWG numbers mean thicker wire. The correct gauge depends on two factors: the maximum current the wire will carry (in amperes), and the length of the wire run (longer runs need thicker wire to prevent voltage drop).
For the high-current cables between your battery and inverter — which can carry 80–100+ amps — you’re looking at 2 AWG or larger. Use a wire sizing chart; there’s no shortcut here, and this is not the place to guess.
Fusing:
Every wire in your system that connects to the battery positive terminal needs a fuse, sized just above the maximum continuous current for that circuit. The fuse is not there to protect your devices — it’s there to protect the wire. If a short circuit occurs (a wire touches ground, causing a sudden massive current draw), the fuse sacrifices itself before the wire does. Without a fuse, the wire becomes the sacrificial element, and it will let you know about it by melting or burning.
Fuse positions matter too: fuses should be as close to the battery terminal as physically possible, so that the shortest possible length of wire is unprotected.
Connections:
Bad connections — loose ring terminals, corroded contacts, improperly crimped connectors — are responsible for a disproportionate share of van electrical problems. Use properly sized lugs, a quality ratcheting crimp tool (not pliers), and a multimeter to verify every connection. Electrical tape alone is not an acceptable insulation method for DC high-current connections. Use heat-shrink tubing.
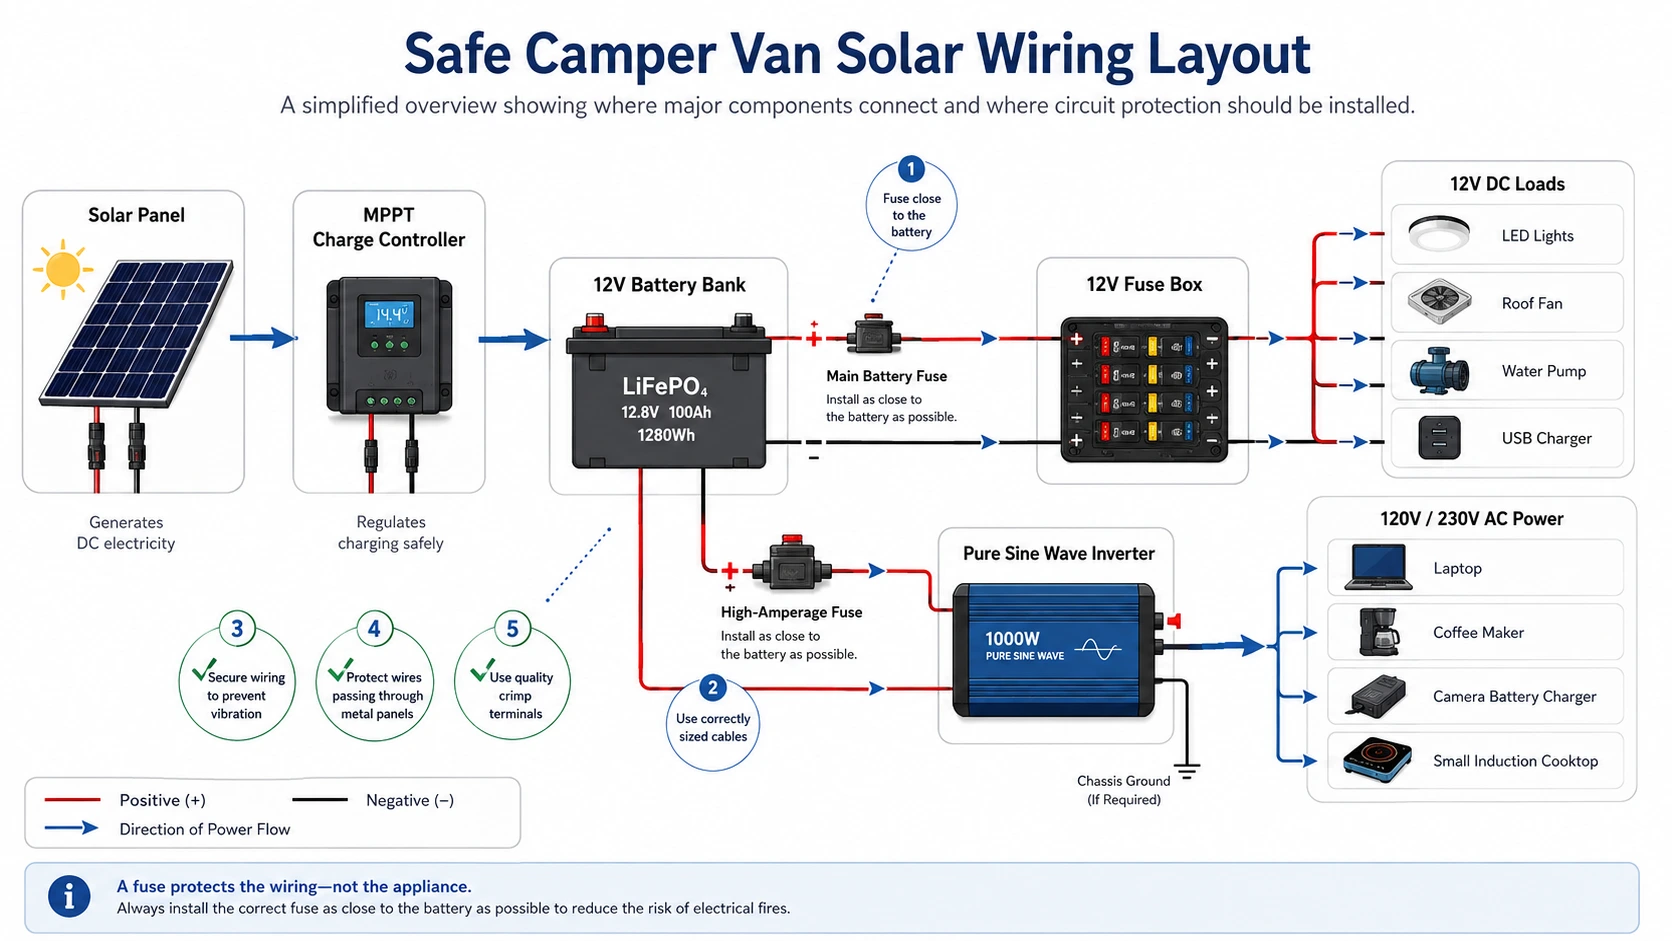
This section probably feels like the least exciting part of the guide. I understand. But I’ve seen what a van electrical fire looks like from the outside, and it’s the kind of thing that makes you take wire sizing charts very seriously.
💡 Bottom Line
Quality wiring and properly sized fuses are just as important as expensive solar panels or batteries. A safe electrical system starts with correct cable sizing, secure connections, and appropriate circuit protection.
A Beginner-Friendly Van Solar Setup
Here’s a real, buildable starter system for someone with moderate daily energy needs, designed to minimize cost without compromising safety:
| Component | Spec | Why |
|---|---|---|
| Solar Panels | 2× 175W Monocrystalline | 350W total; fits most van roofs; expandable |
| Charge Controller | 40A MPPT | Efficient, handles up to ~500W at 12V |
| Battery | 200Ah LiFePO₄ | ~180Ah usable; 2000+ cycles; safe chemistry |
| Inverter | 1000W Pure Sine Wave | Handles laptops, cameras, small appliances |
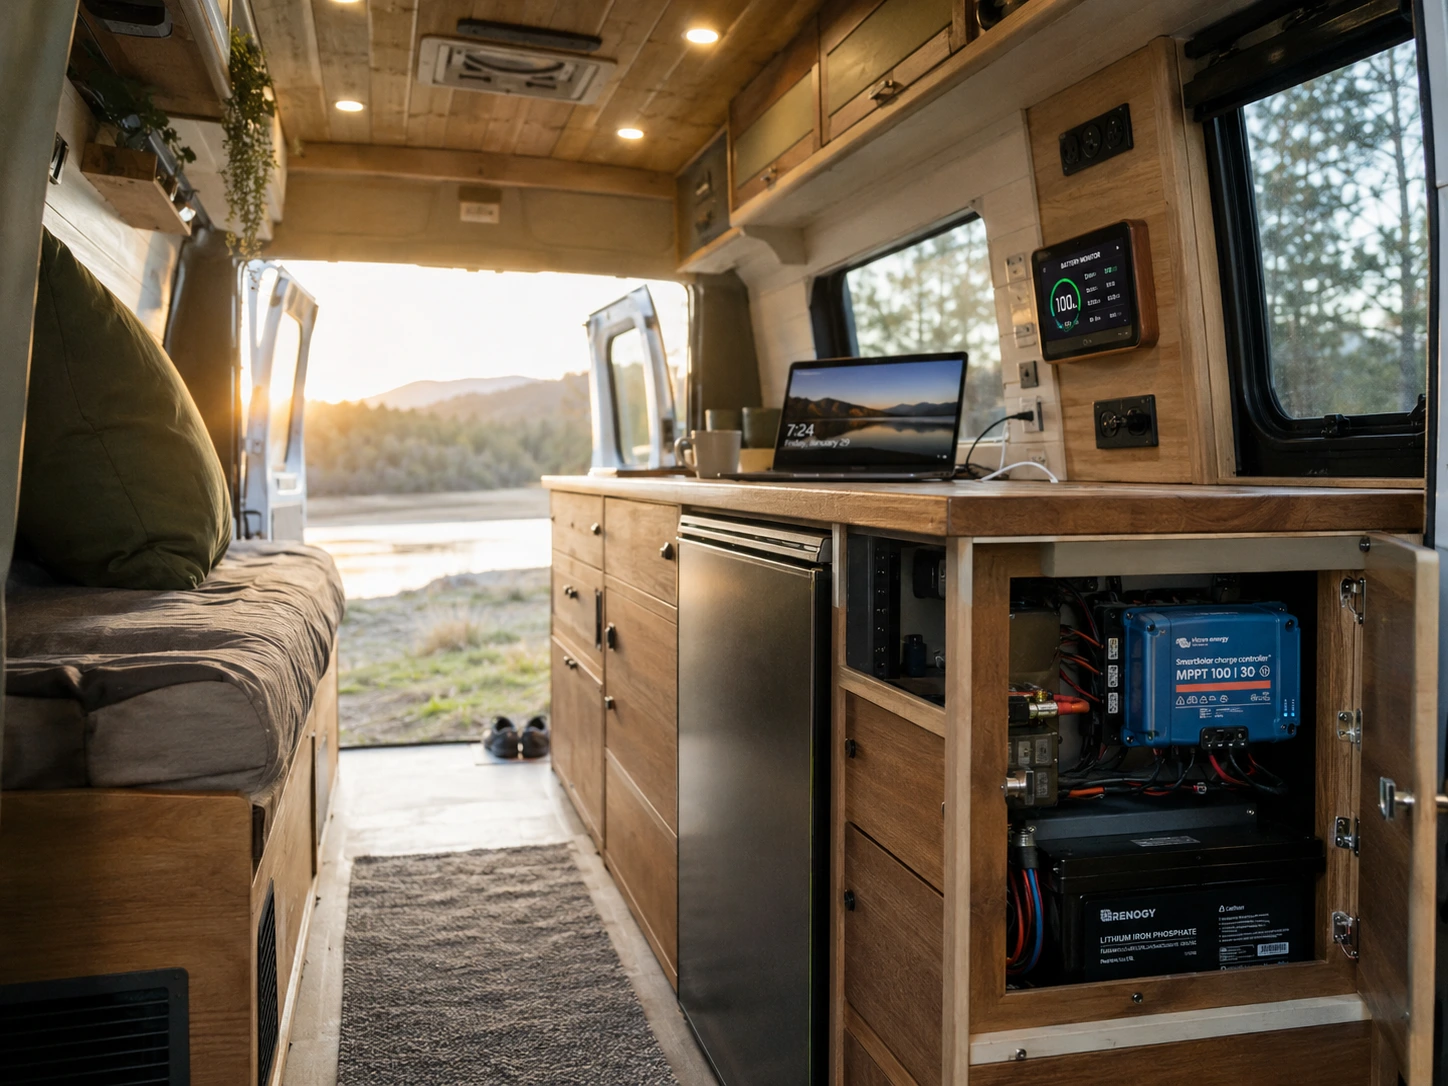
| Battery Monitor | Shunt-based (e.g., Victron BMV-712) | You cannot manage what you cannot measure |
| Wiring | 6 AWG for panel runs; 2 AWG for battery-to-inverter | Safety, efficiency |
| Fusing | ANL fuse near battery + inline fuses on branch circuits | Non-negotiable |
The battery monitor deserves a special mention because it’s easy to skip and absolutely shouldn’t be. A shunt-based battery monitor measures actual current flow in and out of your battery and calculates true state of charge — not the voltage-based guess that most cheap monitors use (and which is notoriously inaccurate for lithium batteries). Knowing your actual battery percentage, your current consumption rate, and how many hours of power you have remaining transforms how you manage your system. It’s the dashboard of your power grid, and driving without a dashboard is how I ended up cooking by headlamp on that hillside.
If you’re curious how similar off-grid technologies have been adapted for extreme environments, our article on NASA in a Van: 5 Space Technologies for Off-Grid Living explores how innovations developed for space missions are finding their way into modern camper vans.
The 3 Beginner Mistakes to Avoid
Mistake #1: Undersizing the battery and oversizing the panels. Panels are cheaper per watt than batteries, so beginners load up on panels and skimp on storage. But panels only produce when the sun is shining. If you can’t store what you generate, the extra panels are irrelevant at night, in a campsite under trees, or on a two-day rainstorm. Balance your production and storage.
Mistake #2: Ignoring the fridge. A 12V compressor fridge is almost always the single largest consumer of energy in a van, often accounting for 40–60% of daily consumption. And because it runs continuously — cycling on and off every 10–20 minutes around the clock — its energy draw is relentless. Build your system around the fridge first; everything else is secondary.
Mistake #3: Buying cheap on the battery and paying for it twice. A no-name lithium battery without a proper Battery Management System (BMS) is not a lithium battery – it’s an expensive risk. The BMS is the circuit that prevents overcharge, over-discharge, and short circuits at the cell level. A quality LiFePO₄ battery with a proven BMS from a reputable manufacturer (Renogy, Battleborn, Epoch, and others have solid reputations) will perform as rated. A cheap no-brand cell without proper protection will not, and the failure modes range from capacity degradation to something much worse.
Before You Buy Anything
- Calculate your daily energy use.
- Choose your battery size.
- Size your solar panels.
- Select an MPPT charge controller.
- Decide whether you need an inverter.
- Buy quality wiring and correctly sized fuses.
- Leave room for future upgrades.
The Part Nobody Talks About: The Satisfaction
I’ve spent this whole guide talking about watts and amp-hours and charge controllers, and I want to end somewhere different.
There’s a specific feeling I haven’t found a perfect word for.
A feeling you get when you wake up in the morning, check your battery monitor, and realize that the sun has already been working for you for an hour while you slept. Your fridge ran all night. Your phone is charged. You have 87% battery and a full day of sun ahead of you, and you owe absolutely nothing to anyone for that electricity.
It’s not quite freedom — that word is overused. It’s more like sufficiency. A quiet, physical, slightly technical sense that you have built a thing that works, that you understand why it works, and that it is going to take care of you in places where the grid doesn’t reach.
That feeling is available to anyone willing to spend a few hours doing the math and a few weekends doing the wiring.
The sun is already shining. It’s just waiting for you to point something at it.

Frequently Asked Questions
The right number of solar panels depends on how much electricity you use each day. A simple weekend setup with lights, phone charging, and a small fan may only need 100–200W of solar panels. If you’re running a 12V fridge, laptop, camera gear, and other electronics regularly, 300–400W is a more practical starting point. Calculate your daily energy consumption first, then size your solar array to replace that energy under real-world conditions.
Your battery should store enough energy to power your devices when the sun isn’t shining. A 100Ah LiFePO₄ battery is sufficient for many weekend campers, while full-time van lifers often choose 200Ah or more. Rather than guessing, calculate your daily energy use in watt-hours and choose a battery that comfortably covers your expected usage with some reserve for cloudy weather.
An inverter converts the 12V DC electricity stored in your battery into the AC electricity used by most household appliances. If you only use 12V devices and USB-powered electronics, you may not need one. However, if you plan to power a laptop charger, coffee maker, blender, or other standard household appliances, a pure sine wave inverter is usually the best choice.
Yes. A charge controller regulates the electricity flowing from your solar panels to your battery, preventing overcharging and improving charging efficiency. It also protects your battery and helps extend its lifespan. For most camper van solar systems, an MPPT charge controller is worth the extra investment because it captures more energy than a basic PWM controller, especially during cloudy weather and cooler temperatures.
Absolutely. A 12V compressor fridge is one of the most common appliances in a solar-powered camper van. Because it runs throughout the day and night, it’s usually the largest consumer of electricity in the system. With an appropriately sized battery and solar array, you can keep a fridge running reliably without needing campground hookups or a generator.
The total cost depends on the size and quality of the components you choose. A basic beginner system may cost $700–1,200 USD, while a larger setup with LiFePO₄ batteries, additional solar panels, and a high-quality inverter can cost $2,000 USD or more. Buying reliable components from the start often saves money over time by reducing maintenance and avoiding premature replacements.
Many DIY enthusiasts successfully install their own solar systems using quality guides and careful planning. The key is understanding how the major components work together, using correctly sized wiring, and following basic electrical safety practices. If you’re uncomfortable working with electrical systems, having a qualified professional inspect or complete the installation is a worthwhile investment.