

The recipe is rarely what goes wrong with Dutch oven cooking. Heat control is. Most camp cobblers come out burnt on the bottom and raw in the middle for the same reason: the coals went underneath, where they would go on a stove, instead of mostly on the lid where a Dutch oven needs them.
There is a rule that fixes this, and it is simple enough to use in the dark. Take the diameter of your oven in inches. Put that number plus three briquettes on the lid, and that number minus three underneath. A 12 inch oven gets 15 on top and 9 below, and sits at roughly 325 degrees Fahrenheit.
That one rule is worth more than any recipe here. The Dutch oven camping recipes follow, along with the internal temperatures that decide whether dinner is safe rather than merely hot.
One thing before anything else. Never burn charcoal inside a tent, an awning, a camper, a vehicle or any enclosed space, and never bring a Dutch oven indoors to keep warm. Charcoal produces carbon monoxide, which has no smell and kills people in their sleep every year. Cook outside, in the open air, always.
The coal rule that replaces guessing
Roughly two thirds of your heat goes on the lid and one third underneath. That ratio is the whole technique.
| Oven size | Briquettes on the lid | Briquettes underneath | Total |
|---|---|---|---|
| 8 inch | 11 | 5 | 16 |
| 10 inch | 13 | 7 | 20 |
| 12 inch | 15 | 9 | 24 |
| 14 inch | 17 | 11 | 28 |
That gives roughly 325 F, which suits almost everything in this article.
To adjust: on an 8 inch oven, one briquette in either direction moves the temperature about 25 degrees. On a 10 inch oven or larger, it takes two briquettes to move it 25 degrees. Want 375 F in a 12 inch oven? Add four coals, distributed in the same two-to-one ratio.
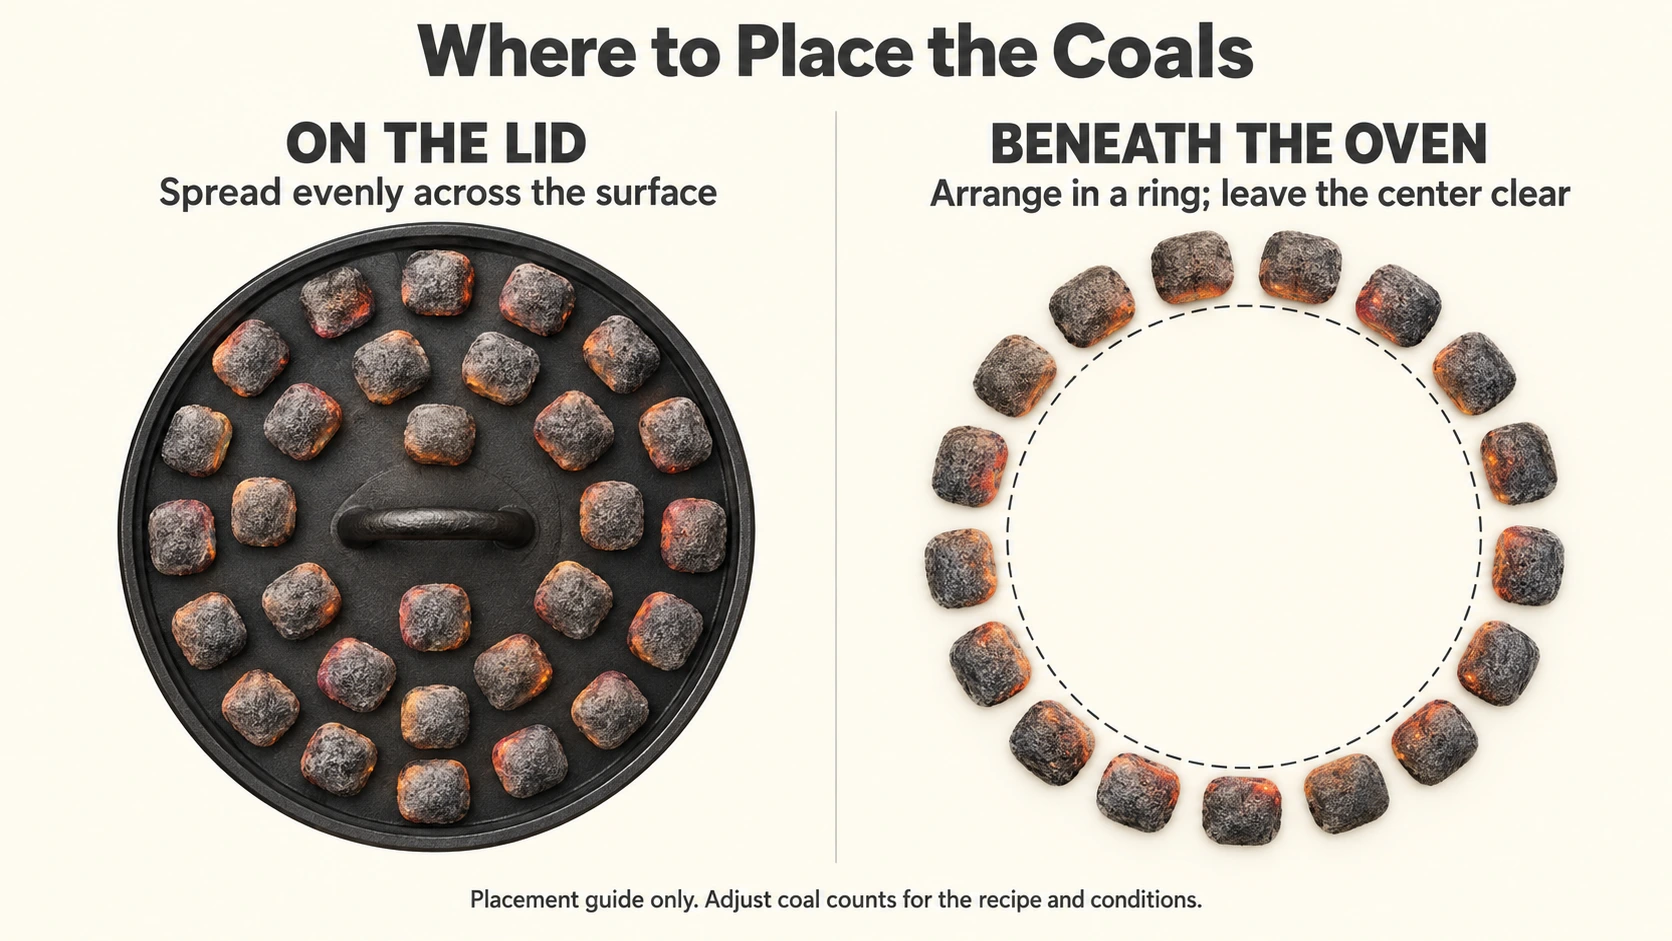
Placement matters as much as the count. Underneath, arrange the coals in a ring tucked under the outer edge of the base, not piled in the middle. A pile in the centre is exactly what burns the bottom of a cobbler. On the lid, spread them in a checkerboard pattern across the whole surface so the heat is even.
Two more habits that separate good camp cooking from guesswork:
- Rotate. Every 15 minutes, turn the oven a third of a turn in one direction and the lid a third of a turn in the other. This evens out hot spots from wind and uneven coals.
- Expect to rebuild. Briquettes give useful heat for roughly 45 minutes to an hour. Anything cooking longer needs a second batch lit and ready before the first dies.
Wind steals heat quickly. On a breezy day add a few coals and put something solid on the windward side.
The temperatures that are not negotiable
Camp cooking has a food safety problem that home cooking does not: no thermometer on the appliance, no reliable way to judge by eye, and a cool box that has been in a hot car.
Carry a digital instant-read thermometer. It is small, cheap, and it is the only way to know. The FDA publishes the same figures if you want a second copy for the kitchen wall. The USDA safe minimum internal temperatures that apply to the recipes below:
| Food | Safe minimum internal temperature |
|---|---|
| All poultry, including chicken pieces | 165 F |
| Ground beef, pork, lamb and veal | 160 F |
| Egg dishes | 160 F |
Measure in the thickest part, away from bone and fat.
Two other rules that matter more in camp than at home. Bacteria multiply fastest between 40 F and 140 F, so keep cold food genuinely cold in the cool box, not just shaded. And discard perishable food left out at room temperature for more than two hours, or more than one hour if it is above 90 F. That second figure is the one that catches people on a hot afternoon.
Five Dutch oven camping recipes
Each one is sized for a 12 inch oven and written around the coal counts above.
Recipe 1: One-pot campfire chili
The most forgiving thing you can make in a Dutch oven, and the one to learn on.
| Prep 15 minutes. Cook about 1 hour. Serves 6. 12 inch oven. |
You need: 500 g ground beef, an onion, two peppers, two tins of chopped tomatoes, two tins of beans (kidney, black or mixed), a tin of sweetcorn, two tablespoons chili powder, a teaspoon each of cumin and smoked paprika, salt, and cooking oil. Keep the can liquids for this recipe.
- Set the oven over a ring of about 20 hot coals with no lid, to work as a frying pan.
- Brown the beef, breaking it up. Drain excess fat off if there is a lot.
- Add the chopped onion and peppers. Cook until the onion is soft, about 5 minutes.
- Add everything else. Stir. Do not drain the tins; the liquid is what stops it catching.
- Put the lid on, move to 15 coals on top and 9 below, and leave it 45 minutes. Rotate every 15.
- Check the beef reaches 160 F before serving.
Chop the onion and peppers at home and bring them in a bag. It saves a knife, a board, washing up, and twenty minutes of your evening.
Recipe 2: Campfire bread
Bread in a Dutch oven is genuinely impressive and surprisingly hard to ruin, as long as the coals are mostly on the lid.
| Prep 10 minutes. Cook 30 to 35 minutes. Makes one loaf. 10 or 12 inch oven. |
You need: 500 g self-raising flour, a teaspoon of salt, about 350 ml water or beer, oil or butter for the pot. Measure the dry ingredients into a bag at home.
- Line the oven with baking parchment, or grease it well.
- Mix the flour and salt with the liquid until it just comes together. Do not knead it much; this is a soda-style loaf, not a yeasted one.
- Shape into a round, put it in, and cut a cross in the top about a centimetre deep.
- Lid on. Heavy on top: for a 12 inch oven use 17 or 18 coals on the lid and only 6 or 7 underneath. Bread burns from below faster than anything else.
- Bake 30 to 35 minutes. It is done when it sounds hollow tapped on the base.
If you smell burning before 25 minutes, take coals off the bottom, not the top.
Recipe 3: Breakfast hash with eggs
The best argument for carrying a Dutch oven, and it uses whatever is left in the cool box.
| Prep 10 minutes. Cook 30 minutes. Serves 4. 12 inch oven. |
You need: 1 kg potatoes cut into 2 cm cubes, an onion, 200 g bacon or sausage, 6 eggs, oil, salt, pepper. Paprika if you have it.
- No lid, about 20 coals underneath. Cook the bacon or sausage until browned, then set it aside.
- Add the potatoes to the fat. Spread them out and leave them alone for 5 minutes before stirring, or they will not crisp.
- Add the onion. Cook another 10 minutes, stirring occasionally, until the potatoes are tender.
- Return the meat. Make six wells in the surface and crack an egg into each.
- Lid on, coals redistributed to about 14 on top and 8 below. Cook 8 to 10 minutes until the whites are firm and the yolks set to your preference. For food safety, cook until the yolk and white are firm.
Parboiling the potatoes at home cuts fifteen minutes off this and makes crisping much more reliable.
Recipe 4: Chicken and rice
The one that needs the thermometer, and the one that feeds the most people for the least money.
| Prep 10 minutes. Cook about 45 minutes. Serves 5. 12 inch oven. |
You need: 6 to 8 bone-in chicken thighs, 400 g long grain rice, 900 ml chicken stock, an onion, two cloves of garlic, a teaspoon of paprika, salt, pepper, oil.
- No lid, about 20 coals underneath. Brown the chicken skin-side down for 6 to 8 minutes. Remove.
- Cook the chopped onion and garlic in the fat for 3 minutes.
- Add the rice and stir it through for a minute so the grains are coated.
- Add the stock and the seasoning, stir once, and lay the chicken on top, skin side up.
- Lid on, 15 coals on top and 9 below. Cook 30 to 35 minutes without stirring.
- Check the thickest part of a thigh, away from the bone. It must read 165 F. If it is short, another five minutes and check again.
Do not lift the lid to look during the rice stage. Every check costs you heat and steam, and rice needs both.
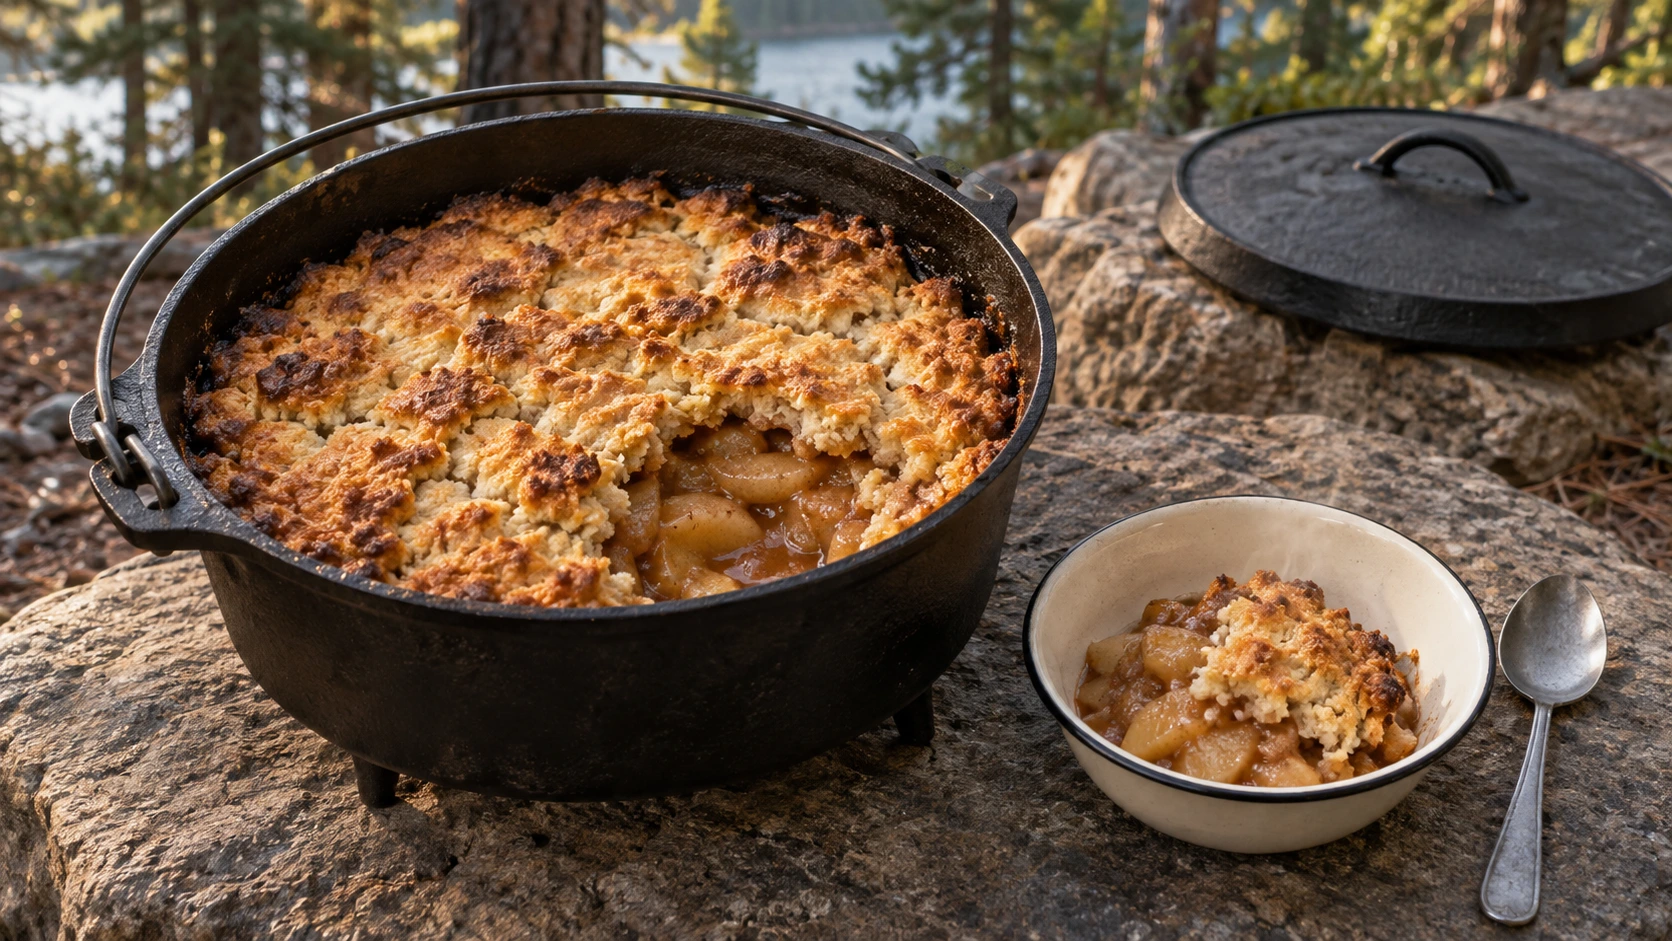
Recipe 5: Apple cobbler
The classic camp dessert, and the one the coal rule rescues.
| Prep 10 minutes. Cook 35 to 40 minutes. Serves 6. 12 inch oven. |
You need: 2 large tins of apple pie filling, or 6 fresh apples peeled and sliced with 100 g sugar and a teaspoon of cinnamon. Plus a box of plain sponge or vanilla cake mix, 100 g butter, and a handful of oats if you like the texture.
- Grease the oven. Put the apple in and spread it level.
- Sprinkle the dry cake mix evenly over the top. Do not stir it in. That is the whole trick.
- Dot the butter across the surface in small pieces, and scatter the oats.
- Lid on. Very heavy on top: for a 12 inch oven use 18 coals on the lid and 5 or 6 underneath.
- Cook 35 to 40 minutes, rotating every 15. It is done when the top is golden and the fruit is bubbling at the edges.
Burnt cobbler is almost always too many coals underneath. If in doubt, take two off the bottom and add them to the lid.
Cleaning and seasoning in the field
Cast iron looks after itself if you do three things and avoid one.
Clean it hot. Scrape it out while it is still warm, then add a little water and let it steam. Most of what is stuck comes away with a wooden spoon or a chainmail scrubber. Cold, dried-on food is a different job entirely.
Skip the soap, or use very little. Modern washing-up liquid will not strip a good seasoning the way old lye-based soap did, but the less you use the better the surface stays. A stiff brush and hot water handles almost everything.
Dry it completely, then oil it. Put it back over the dying coals for a few minutes until every trace of water is gone, then wipe a thin film of cooking oil over the inside with a cloth. Thin is the operative word. A thick coat goes sticky and rancid before your next trip.
Never leave it wet, and never store it with the lid clamped on. Trapped moisture is what rusts cast iron. Store it with a folded paper towel between pot and lid so air can move.
On washing water: carry it at least 60 metres from any stream, lake or water source before you dispose of it, strain out the food solids and pack them out with your rubbish, and scatter the water widely rather than pouring it in one spot. Food scraps left near a site attract animals, which is a problem for you tonight and for whoever camps there next week.
What to do before you leave home
If you are still planning the rest of the menu, our guide to easy camping food ideas covers the meals that need no oven at all.
Three things that make the difference between camp cooking being a pleasure and being a chore.
Chop everything, measure the dry ingredients into labelled bags, and mix the spices in advance. You save water, washing up, packing space and the specific frustration of chopping an onion by head torch.
Count your charcoal before you go. Each meal above uses 20 to 28 briquettes, and long cooks need a second batch. Running out halfway through a cobbler is the most avoidable disappointment in camp cooking.
And put the thermometer in the box. It weighs nothing, and it is the difference between thinking the chicken is done and knowing.
Cooking temperatures and food-handling time limits follow USDA guidance. Charcoal counts are approximate; actual heat varies with wind, weather, briquette brand, and burn time.