
How To

How to Navigate Without a Compass: 5 Easy Ways to Find Direction

Muhammad Jawad Published September 11, 2026 · 7 Min Read
Contents
  1. 1. Shadow-Stick Method
  2. 2. Analog Watch Method
  3. 3. North Star Navigation
  4. 4. Southern Cross Navigation
  5. 5. Natural Navigation Clues
  6. How Accurate Is It to Navigate Without a Compass?
  7. FAQ
  8. Can you navigate without a compass?+
  9. What is the easiest way to find direction without a compass?+
  10. How does the shadow-stick method help you find direction?+
  11. How can you find north without a compass at night?+
  12. Can you use the Moon to find direction?+
  13. Can you use an analogue watch as a compass?+
  14. Are natural navigation clues reliable?+
  15. What is the most reliable way to navigate in the wilderness?+
  16. Final Thoughts

The trail forks ahead, the light is fading, and your compass, the one you swore you packed, is nowhere in your bag. It’s a situation any hiker could face. Learning how to navigate without a compass isn’t about memorizing survival trivia; it’s about reading the sky, the ground, and the shadows as tools that people have used to orient themselves for generations.

These methods can help you estimate cardinal directions and regain a general sense of orientation, but they cannot tell you exactly where you are or replace a map, compass, GPS, or proper route-planning skills. Here are five low-tech ways to estimate direction when your gear lets you down.

1. Shadow-Stick Method

How it works: A stick planted upright in the ground casts a shadow that moves as the sun arcs across the sky. Because the sun rises roughly in the east and sets in the west, the shadow’s movement traces a rough east-west line.

How to use it: Push a straight stick about a meter long into flat, sunlit ground. Mark the tip of its shadow with a small stone. Wait 15–20 minutes, then mark the new shadow tip. Draw a line connecting the two points; this runs approximately east to west, with the first mark to the west.
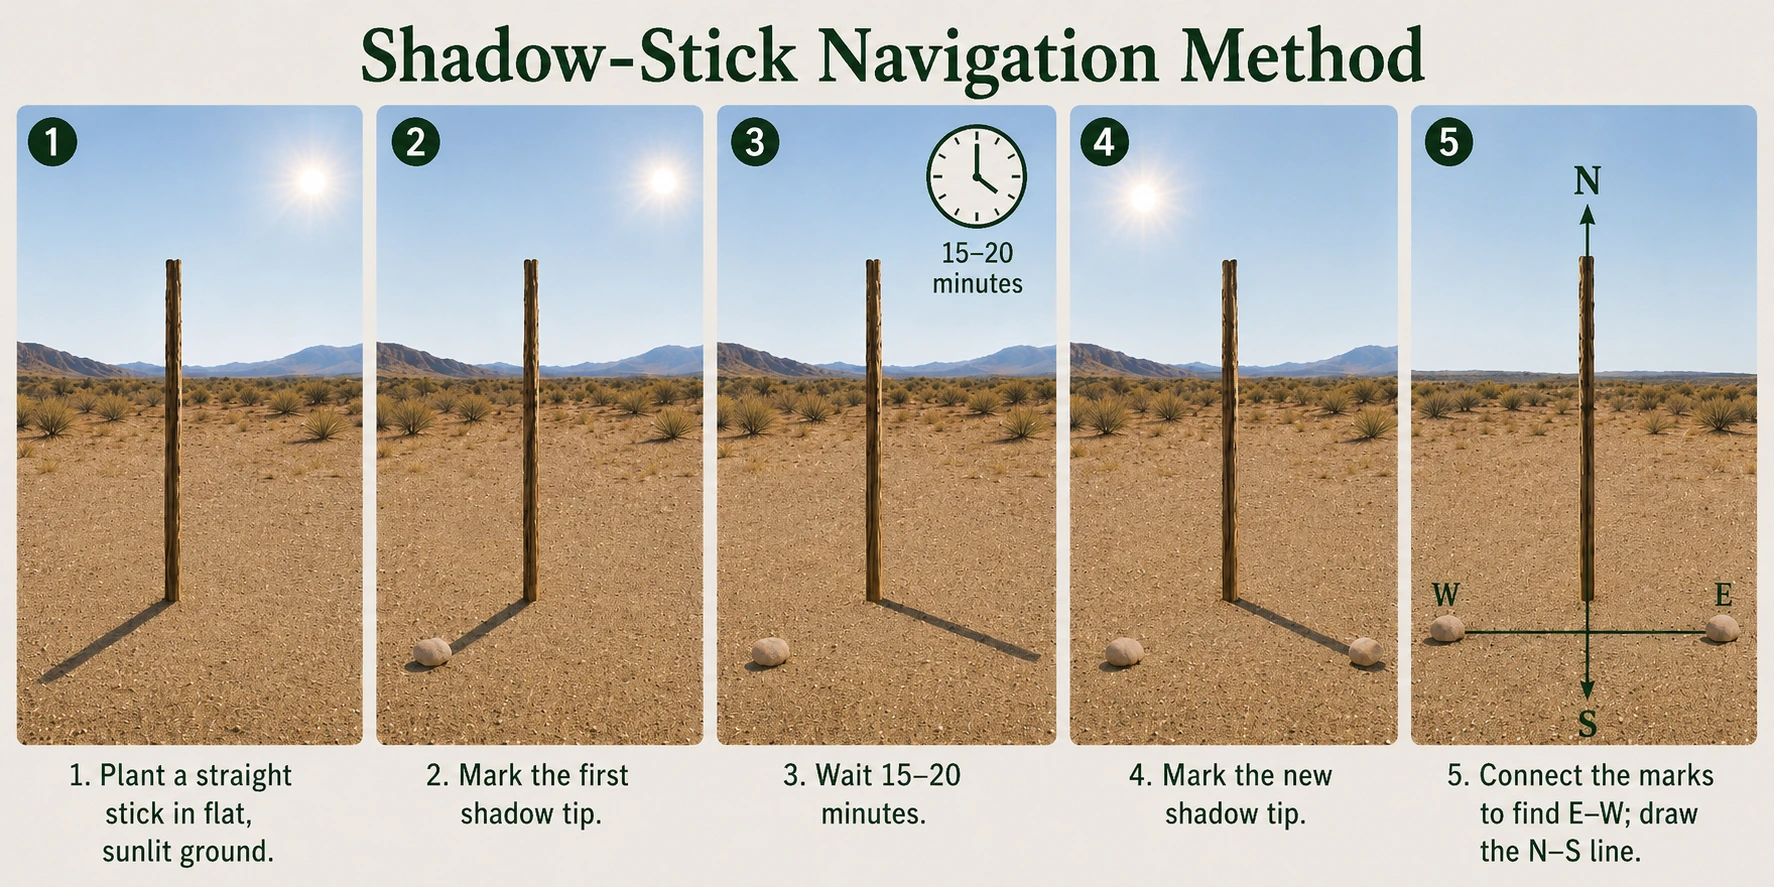
Five-step shadow-stick method to navigate without a compass, using two shadow-tip markers to estimate east-west and north-south directions.

When/why it’s useful: It requires nothing but sunlight and patience, making it a useful daytime method when you have time to wait.

Did you know? This exact technique is sometimes called the “stick and shadow method,” and the technique has also appeared in U.S. military navigation and survival manuals as a practical way to estimate direction.

2. Analog Watch Method

How it works: An analog watch can act as a simple sundial. In the Northern Hemisphere, point the hour hand toward the Sun. The approximate direction of south lies halfway between the hour hand and 12 o’clock.

This field-expedient direction-finding method assumes standard local clock time, so daylight-saving adjustments must be accounted for where applicable.

How to use it: Hold the watch flat and point the hour hand directly at the Sun. Imagine a line halfway between the hour hand and 12 o’clock; this gives an approximate south direction. In the Southern Hemisphere, the method is reversed: point 12 o’clock toward the Sun, with the midpoint between 12 and the hour hand indicating approximate north.
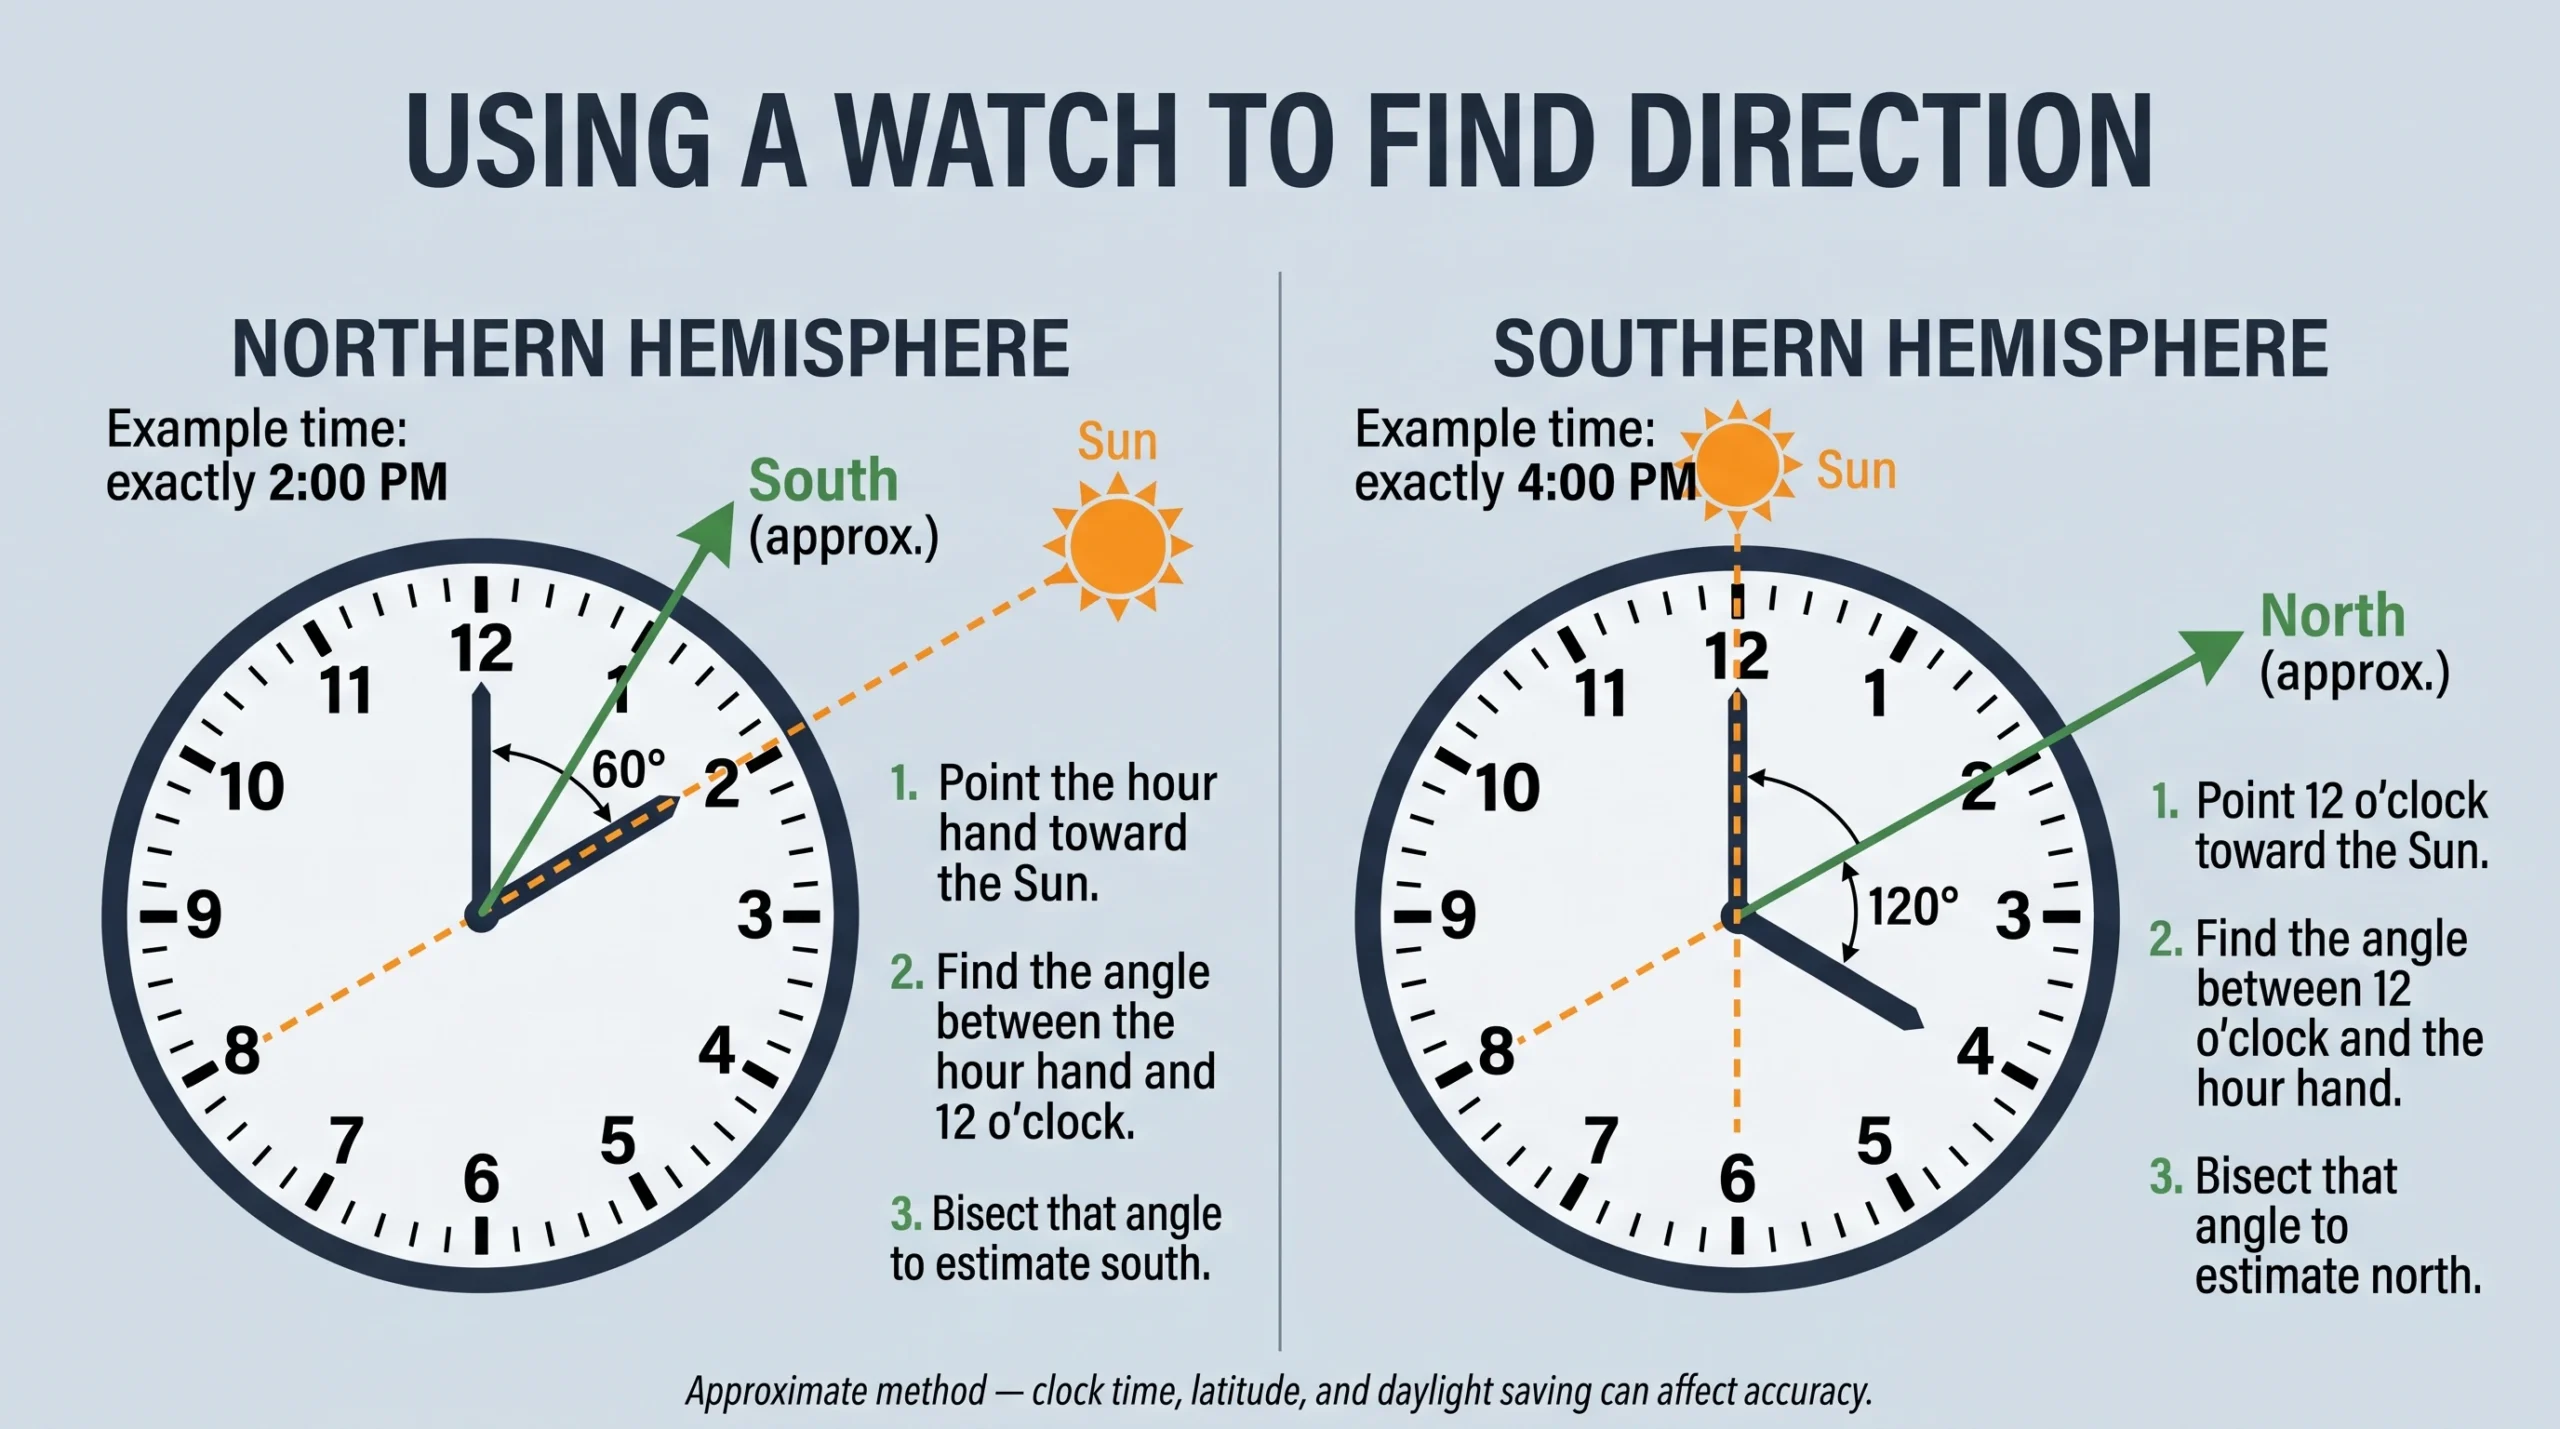
Analog watch method comparing Northern and Southern Hemisphere direction finding using the Sun and angle bisectors.

When/why it’s useful: It’s a quick way to estimate direction when you have an analog watch and clear sunlight, but it is only an approximation. Time zones, daylight saving time, latitude, and the difference between clock time and solar time can affect the result.

Did you know? Your watch follows standardized clock time, while the Sun follows local solar time—so the two don’t always align perfectly.

3. North Star Navigation

How it works: In the Northern Hemisphere, Polaris, the North Star, sits almost directly above the Earth’s northern axis, so it barely appears to move through the night. Find it, and you have a close approximation of true north.

How to use it: Locate the Big Dipper. The two outer stars of its “cup,” known as the pointer stars, form a line that, extended about five times their distance, leads close to Polaris, a moderately bright star standing alone in that stretch of sky. Once you find Polaris, face toward it to face approximately true north.
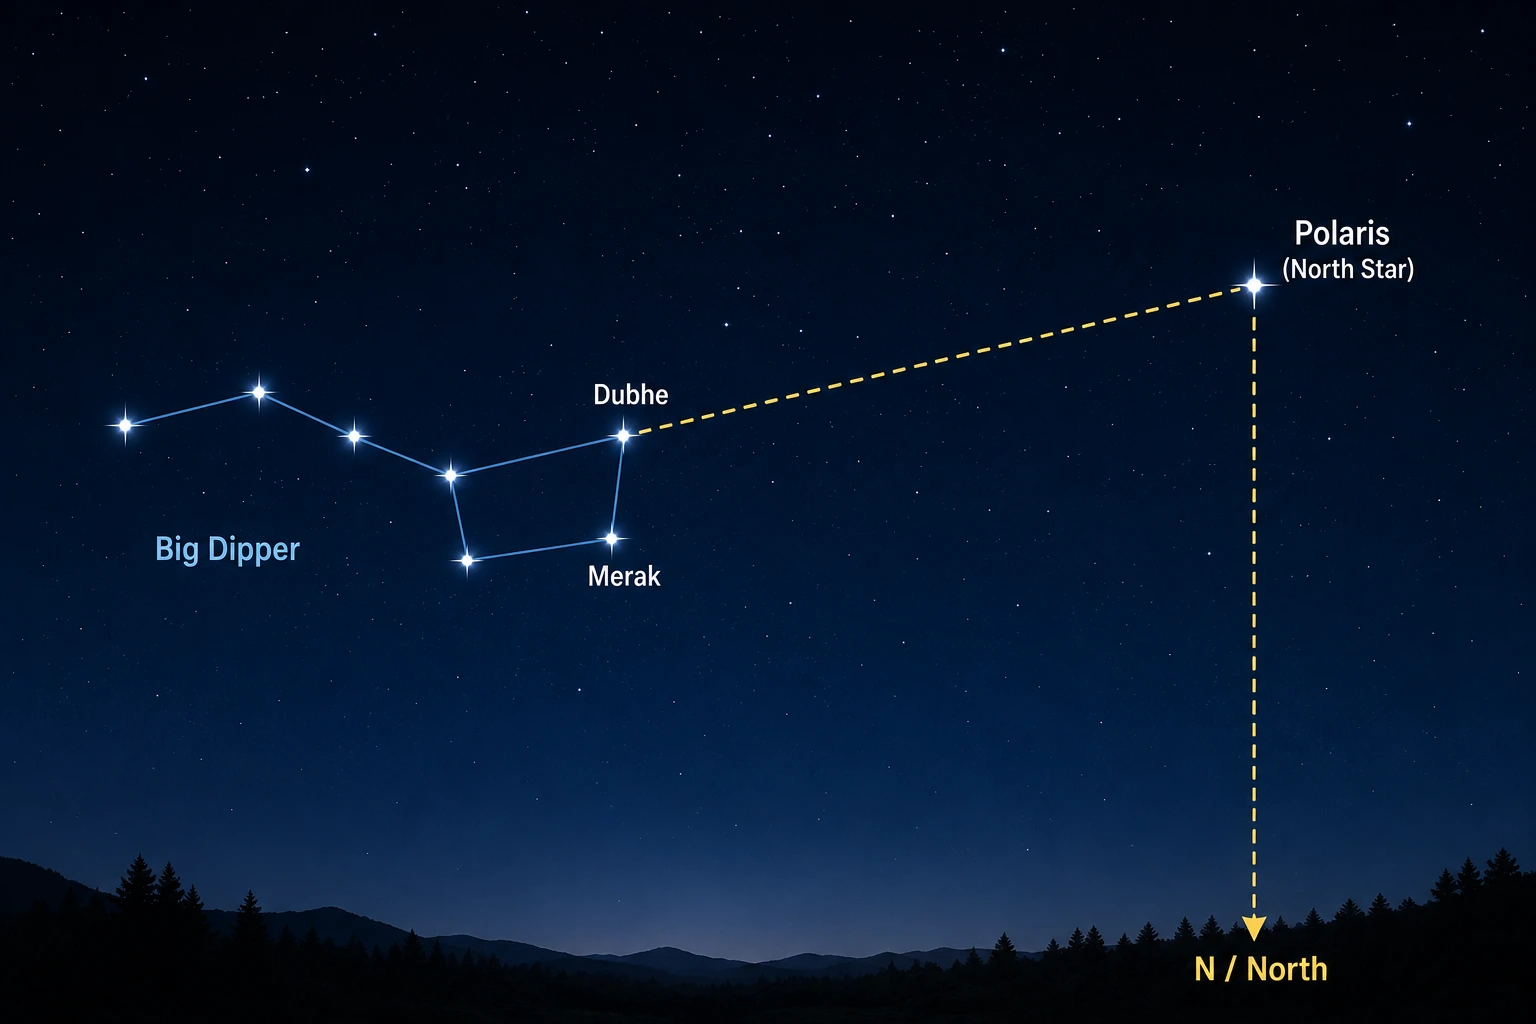
Big Dipper with Merak and Dubhe labeled, a guide toward Polaris, and a north marker.

When/why it’s useful: It’s one of the most reliable night-sky methods for finding a fixed direction in the Northern Hemisphere, making it especially useful for stargazers and night hikers navigating clear, dark skies far from city light.

A steady point: Polaris isn’t the brightest star in the sky; it’s simply the one that barely moves, night after night, generation after generation.

4. Southern Cross Navigation

How it works: In the Southern Hemisphere, there is no bright star like Polaris marking the south celestial pole. Instead, the Southern Cross, or Crux, can be used to estimate the direction of true south.

How to use it: Locate the Southern Cross and identify its long axis, running from Gacrux at the top of the cross through Acrux at the bottom. Extend this line about 4.5 times the length of the cross beyond Acrux to estimate the position of the south celestial pole. From that point, imagine a line dropping straight down to the horizon; this gives you approximately true south.
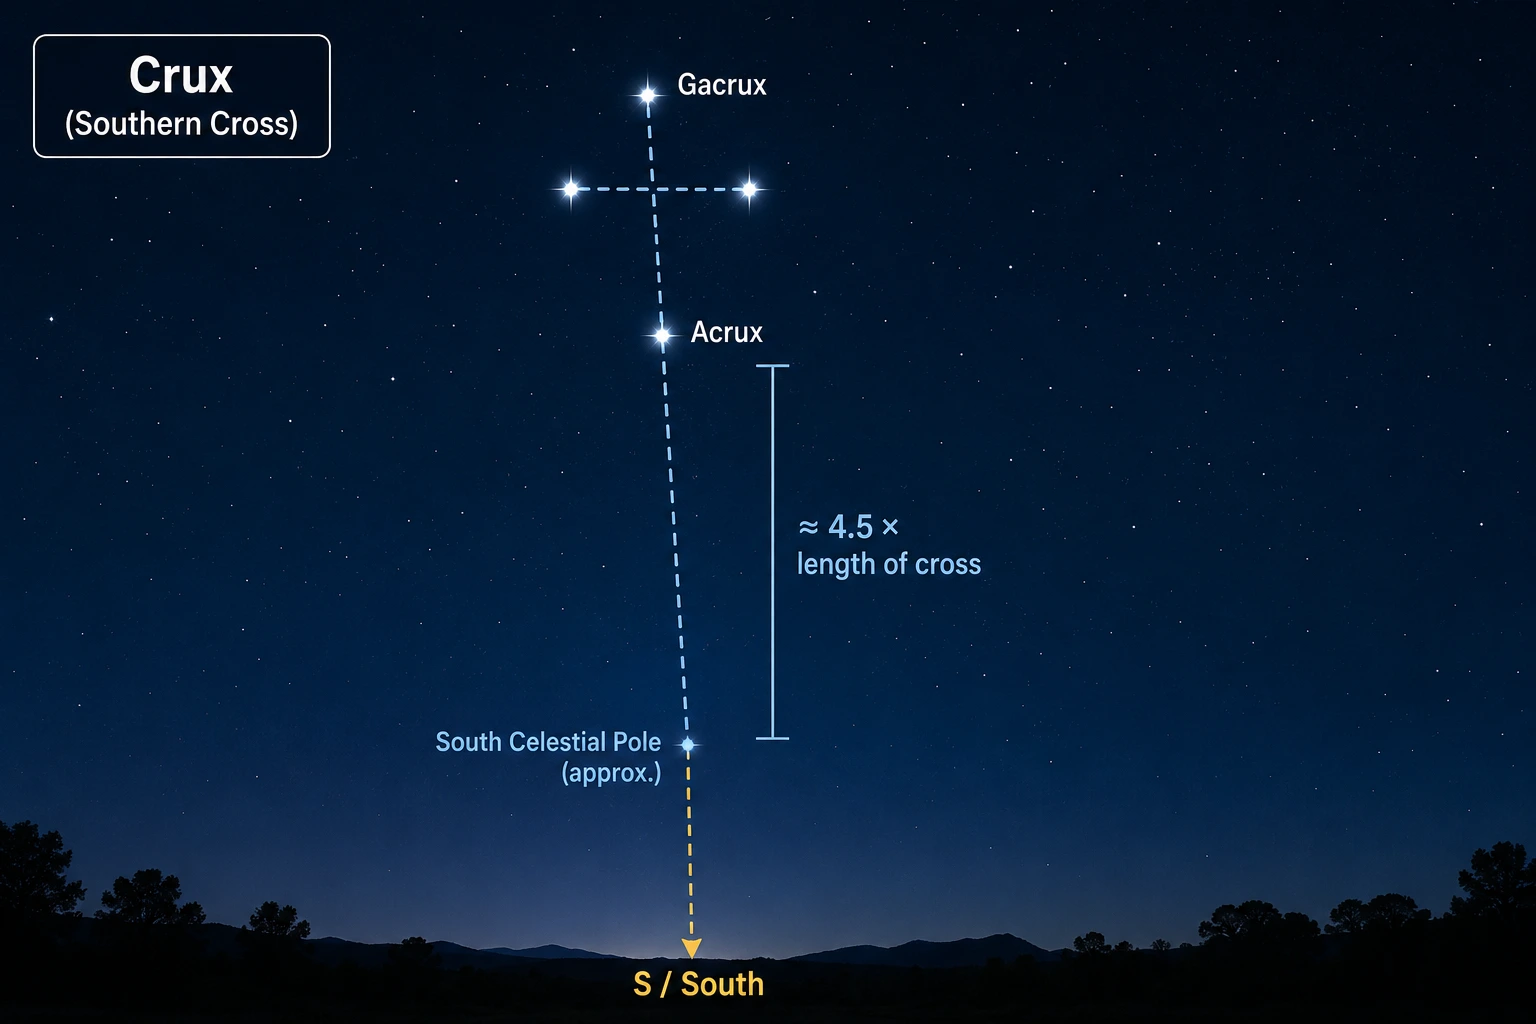
Southern Cross diagram showing Gacrux, Acrux, the south celestial pole, and the approximate direction of south.

When/why it’s useful: It’s a useful night-sky method for finding south in the Southern Hemisphere when the constellation is visible and the sky is clear.

A southern signpost: Unlike the Northern Hemisphere, the Southern Hemisphere has no bright pole star, which is why the Southern Cross has long served as a useful celestial guide.

5. Natural Navigation Clues

How it works: Plants, terrain, and weather patterns respond consistently to sunlight, prevailing winds, and moisture, leaving subtle directional clues written into the landscape itself.

How to use it: Natural features can sometimes provide supporting clues, but they are highly dependent on local climate, species, terrain, wind, moisture, and exposure. Moss, tree growth, snow, and insect structures should never be treated as standalone indicators of north or south.

When/why it’s useful: These clues work anywhere, day or night, but they’re best used together as supporting evidence rather than a single deciding factor.

A useful clue: No single natural indicator is foolproof alone, but several independent clues pointing the same way can increase your confidence.

How Accurate Is It to Navigate Without a Compass?

These techniques provide approximate direction, not precise navigation. Weather, latitude, season, terrain, visibility, and human error can affect the result. For serious backcountry travel, carry and know how to use a map, compass, and GPS.

Remember that knowing which way is north does not necessarily tell you where you are or which route is safe. If you become genuinely lost and cannot confidently retrace your route, avoid choosing a direction at random and walking farther into unfamiliar terrain.

FAQ

Yes. You can estimate direction using methods such as the shadow-stick method, an analog watch, the North Star, the Moon, and natural navigation clues. These methods provide approximate direction rather than the precision of a compass or GPS.

The shadow-stick method is one of the simplest options during daylight because it requires only a straight stick, sunlight, and a few minutes of waiting.

Mark the tip of a stick’s shadow, wait 15–20 minutes, and mark the new shadow tip. Connecting the two marks gives an approximate east-west line, with the first mark toward west.

In the Northern Hemisphere, you can locate Polaris, the North Star. It appears almost stationary in the night sky and indicates the direction of true north.

The Moon can provide rough directional clues because it reflects sunlight and follows a predictable cycle. However, moon navigation is less reliable than a compass or other established navigation methods.

An analog watch can provide a rough directional estimate using the Sun. In the Northern Hemisphere, pointing the hour hand toward the Sun and using the midpoint between it and 12 o’clock gives an approximate south direction.

Natural clues such as moss, tree growth, snow patterns, and terrain can sometimes provide useful supporting evidence, but none should be treated as a foolproof way to determine direction.

For situations where accurate navigation is important, a compass and GPS are more reliable than natural navigation techniques. The methods discussed in this guide are best used as backup skills or orientation aids.

Final Thoughts

These five methods are wonderful tools for orientation and getting a rough sense of direction, the kind of skills that can deepen your awareness of the landscape around you. These techniques can help you regain a general sense of direction, but they should not replace a map, compass, GPS, or proper route-planning skills in serious backcountry travel. Let these methods be your backup, your curiosity, and your connection to the old ways of finding your way home.

For more reliable backcountry navigation, learn how to read a topographic map and combine terrain information with a compass or GPS.

Written by

Muhammad Jawad

Muhammad Jawad writes Earthshine Journal's stargazing, dark-sky travel and camping coverage. Published work includes beginner guides to the night sky, smartphone astrophotography, dark-sky destination research, camp cooking and night-time safety outdoors, alongside science explainers on subjects such as wind and Saturn's ring plane crossing. Articles published under this byline are researched and fact-checked in line with the Editorial Policy.

Up Next
Camper van powered by rooftop solar panels parked at sunrise with an off-grid workstation.
How ToCamping & Gear

How to Build a Camper Van Solar System on a Budget

Let me tell you about the exact moment I understood electricity.Not in school — I sat through those lessons the way most people do, understanding just enough to pass and forgetting most of it by the following Tuesday. No, I mean the moment it actually clicked.I was parked on a remote hillside as the sun disappeared behind the ridge. A tiny red light on my charge controller blinked at me like a disappointed parent. My battery was down to 11%. My fridge had two hours left. My laptop had forty minutes. Earlier that afternoon, I had been convinced my solar setup was working just fine.It wasn't.I had made several beginner mistakes at once, and that evening I was paying for every one of them.That night, cooking dinner by headlamp and rationing my phone battery, I made myself a promise: I was going to understand this system properly. Not just plug things together and hope for the best, but understand how the electricity moved, what every component did, and why things sometimes went wrong.This guide is the one I wish I'd had before building my first van solar system. We'll break down the entire setup—from solar panels and batteries to charge controllers and inverters—in plain English, show you how to calculate your power needs, avoid expensive mistakes, and build a reliable off-grid power system without blowing your budget.Let's build a power grid.A small one.On wheels.How a Camper Van Solar System WorksBefore we touch a single component, let's understand what we're actually building. Because here's the thing — a van solar system is not magic, and it isn't nearly as complicated as it first appears. It is, at its core, a simple chain of energy conversion and storage. Once you see that chain clearly, everything else falls into place.Here's the whole system in plain English:The Sun → Solar Panel → Charge Controller → Battery Bank → Your StuffThat's it. That's the whole system.Sunlight hits your solar panel, which converts it into direct current (DC) electricity through the photovoltaic effect—the phenomenon Albert Einstein explained in 1905, work that later earned him the 1921 Nobel Prize in Physics. That electricity then flows into a charge controller, which acts as the system's traffic manager. It ensures your battery receives power safely and efficiently by regulating voltage and current, preventing overcharging and other conditions that could shorten the battery's lifespan.The battery stores that energy until you need it. Whenever you switch on a light, charge your laptop, or power your fridge, electricity flows from the battery to your devices.If you're using standard household appliances—which run on alternating current (AC) rather than 12V direct current (DC)—you'll also need an inverter. It converts the battery's DC power into the AC power that most appliances require. We'll cover that in more detail later.The beauty of this setup is that every component has one clear job. If something stops working, you can usually trace the problem back through this chain to find exactly where things went wrong.If you'd like to understand the science behind how photovoltaic (PV) cells convert sunlight into electricity, the U.S. Department of Energy's guide to how solar works provides an excellent beginner-friendly explanation. U.S. Department of Energy's guide to how solar works.💡Bottom LineA van solar system isn't a collection of confusing gadgets. It's simply a chain of components, each with one specific job. Once you understand that chain, the rest becomes much easier.Step 1: Calculate Your Power NeedsThis is the least exciting part of building a van solar system and, arguably, the most important. Skip it, and every decision you make afterwards will be based on guesswork. It's like building a house before measuring the land.You need to calculate your daily energy consumption in watt-hours (Wh). A watt-hour is simply:Watts × Hours of Use = Watt-hours (Wh)It answers the question: how much energy do I actually use in a day?Let's do a real example. Say your setup includes:DevicePower DrawDaily HoursDaily Wh12V compressor fridge45W average24 hrs (runs intermittently)~500WhLED lighting (3 strips)15W total4 hrs60WhLaptop65W3 hrs195WhPhone charging x220W2 hrs40WhFan (12V)30W5 hrs150WhTotal——~945Wh/dayThat number — roughly 1 kilowatt-hour per day — is your baseline. Everything downstream (how many panels you need, how big your battery bank should be, what size charge controller to buy) is calculated from it.A common beginner mistake: Many first-time builders calculate how much electricity their solar panels can produce and assume they can use all of it. In reality, heat, wiring losses, charge controller efficiency, and battery conversion typically reduce usable energy by 20–30%. Plan around what your system actually delivers—not what the specification sheet says under ideal laboratory conditions.💡Bottom LineDon't choose your solar panels first.Start by calculating your daily energy use. Once you know how much electricity you actually need, choosing the right battery, solar panels, and charge controller becomes straightforward.Step 2: Choose Your Solar PanelsSolar panels are the part everyone gets excited about. They're visible, easy to compare, and often treated as the heart of a van solar system. In reality, they're just one piece of the puzzle. The best panel isn't necessarily the biggest one; it's the one that matches your daily energy needs, available roof space, and travel style.How they work:A solar panel is made of photovoltaic cells, typically silicon-based, which release electrons when photons from sunlight strike them. This creates a flow of direct current electricity. The more cells, the more surface area, and the more efficient the cells, the more electricity per hour of sunlight you generate.The types you'll encounter:Monocrystalline panels are cut from a single silicon crystal. They're the most efficient type currently available for consumer use – typically 20–22% efficiency, meaning they convert about a fifth of the sunlight that hits them into electricity. They're space-efficient (you get more watts per square meter), they perform relatively well in low-light and high-temperature conditions, and they last 25–30 years. They cost a bit more, but for a van or mobile setup where roof space is genuinely limited, the efficiency premium is usually worth it.Polycrystalline panels are made from multiple silicon fragments melted together. They're less efficient (around 15–18%), slightly cheaper, and visually distinguishable by their blue, fragmented crystalline appearance versus the uniform black of monocrystalline panels. For a van roof,…

Continue Reading